
[ad_1]
Make a paint mulling slab in about 30 minutes – to use for making your own artist oils or watercolour paints. Plus an introduction to making your own oil paints.
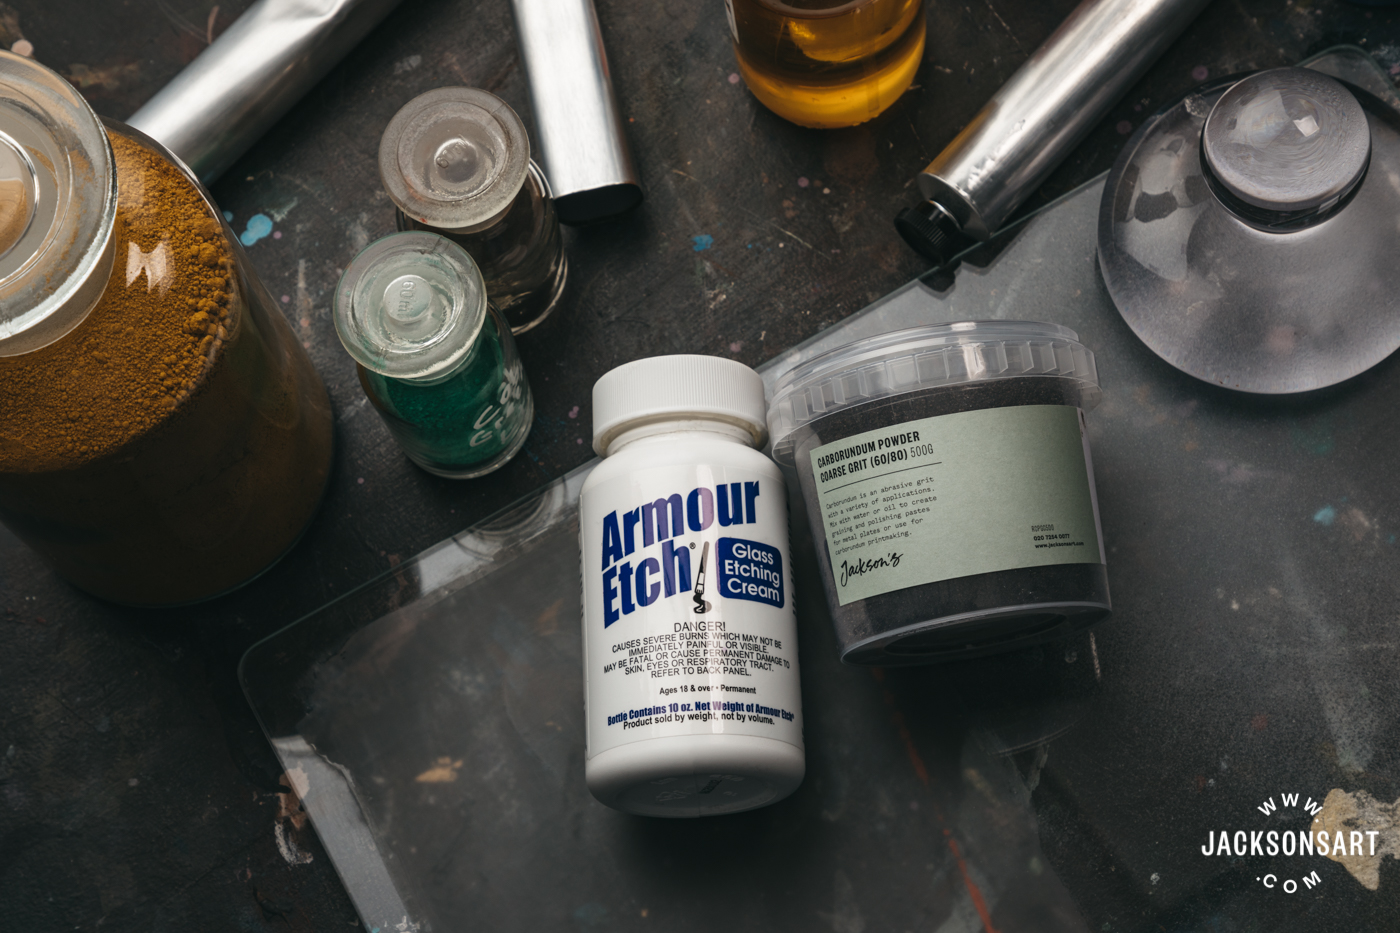
You only need a few things if you want to make oil paint or watercolour paint yourself. The two basic ingredients are dry pigment and a binder. For oil paint the binder is a drying oil, such as linseed oil, and for watercolour paint it is gum arabic. The tools you need are just a glass muller, a glass mulling slab, a palette knife, and an airtight jar or empty paint tube to store your finished paint in. Of these, the hardest thing to find is the glass mulling slab. So I thought I’d see if you could easily transform our glass palette into a mulling slab.
A mulling slab is a sheet of glass that has a frosted surface and a muller is a glass hand tool with the same ground-glass surface. By rubbing pigment and binder between these finely pitted surfaces you get the binder to encapsulate every particle of pigment, so that the pigment is completely suspended in oil for oil paint or gum arabic for watercolour.

I wanted to see if you could frost our glass palette with some glass etching cream or some carborundum grit powder, to make your own paint-making slab simply, in your studio. In Part 1, I show you how to make a paint mulling slab in about 30 minutes. In Part 2, I give some basic introductory information on making your own oil paints. If you are interested in making your own watercolour paints we have this article: Making Handmade Watercolours with Jackson’s Artist Pigments.
Either Glass Etching Cream or Carborumdum Powder will frost glass to make a paint mulling slab.
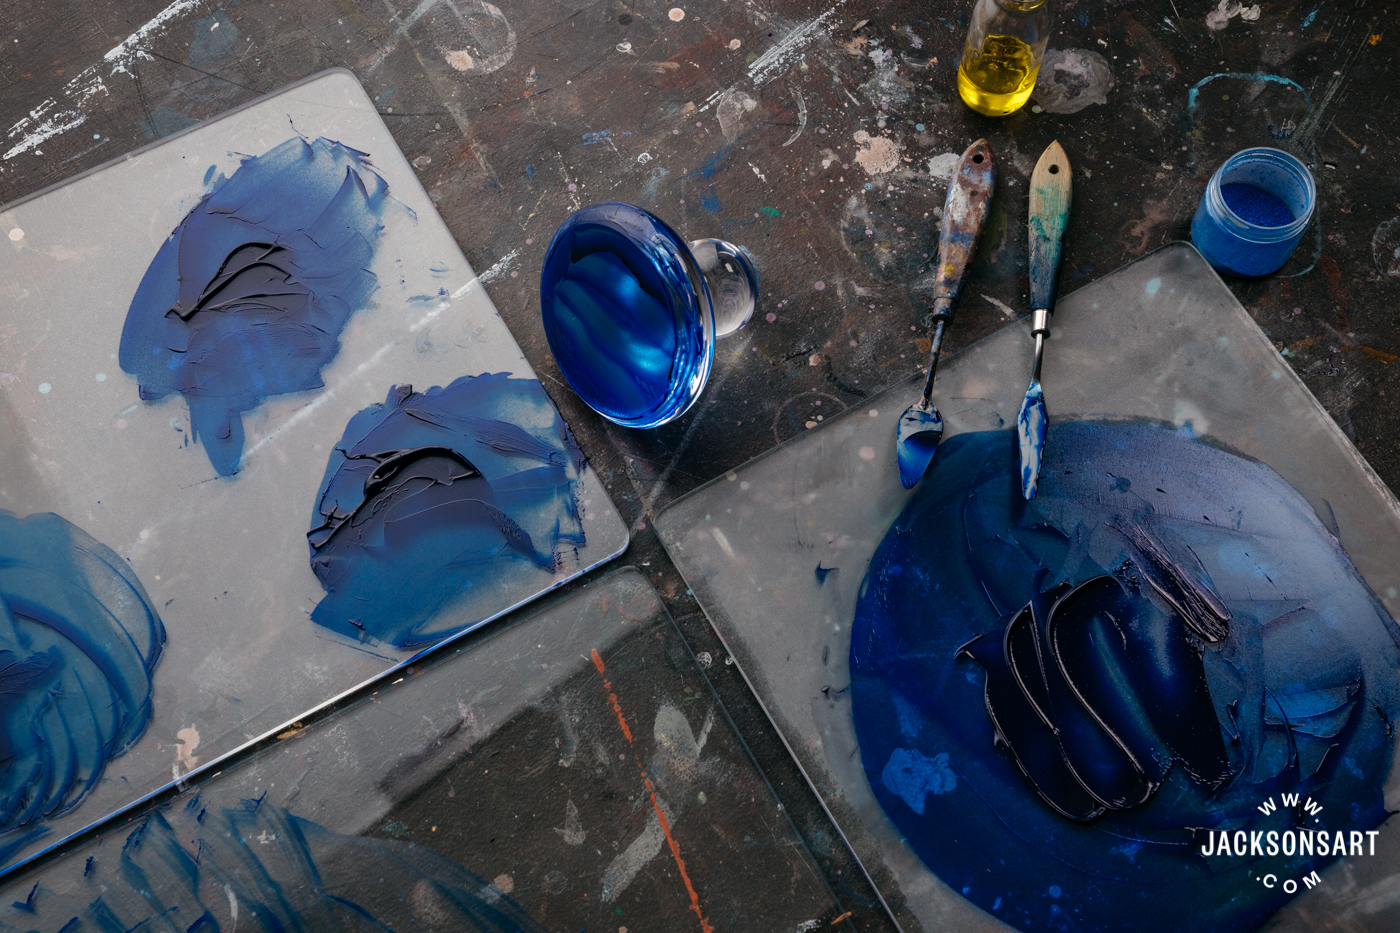
Paint Mullers
Mullers are heavy glass tools that fit in the hand, with a flat, ground-glass surface for swirling over your slab. They come with long handles or short handles and you choose the handle based on the grip you prefer – side grip or top grip. You may find one style easier to use depending on whether you are sitting or standing. I find the short handle easier to use when standing.
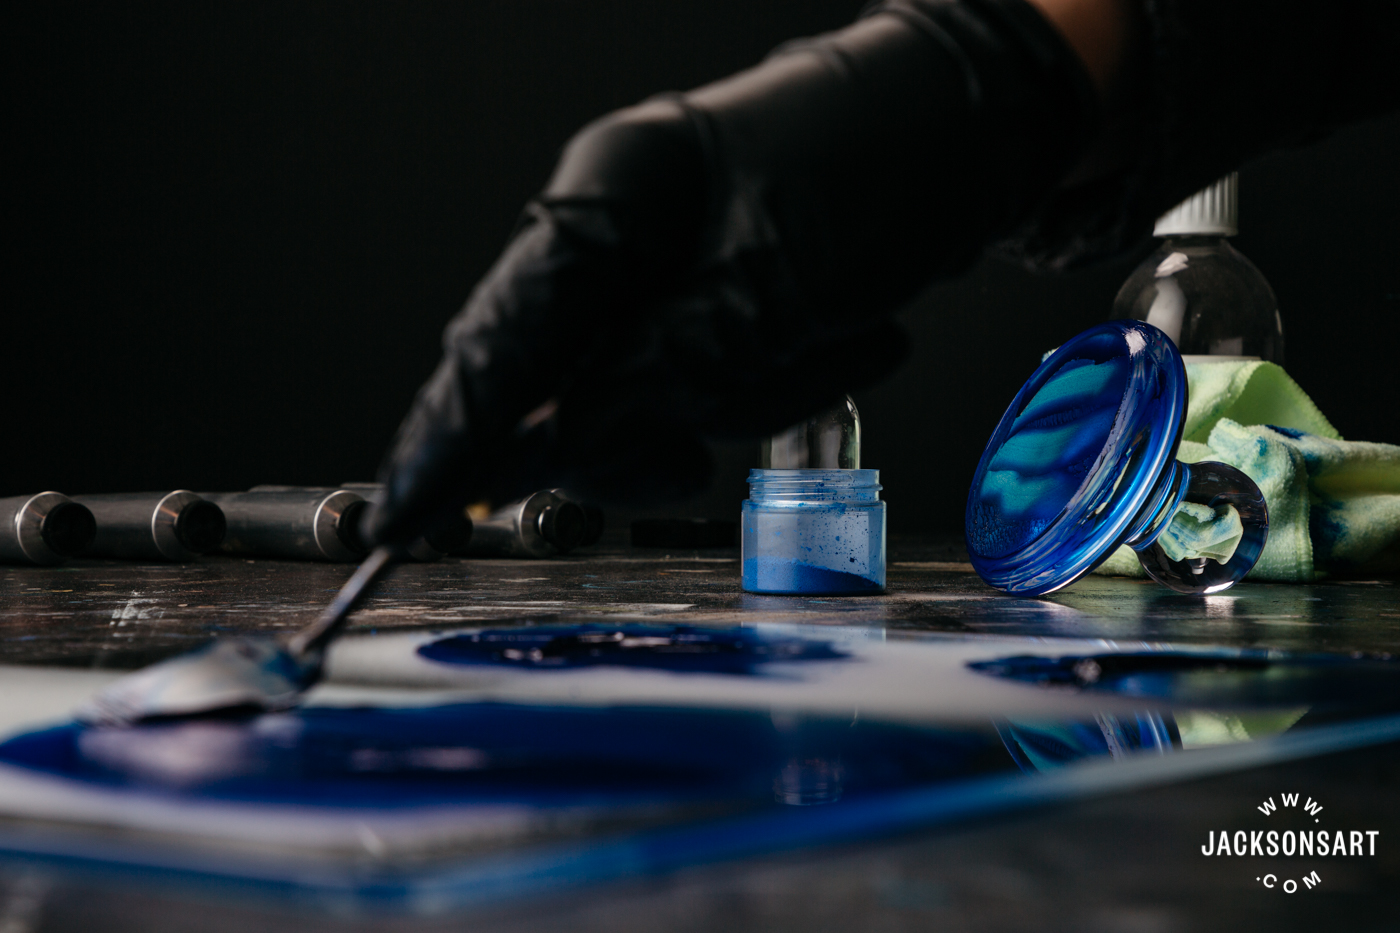
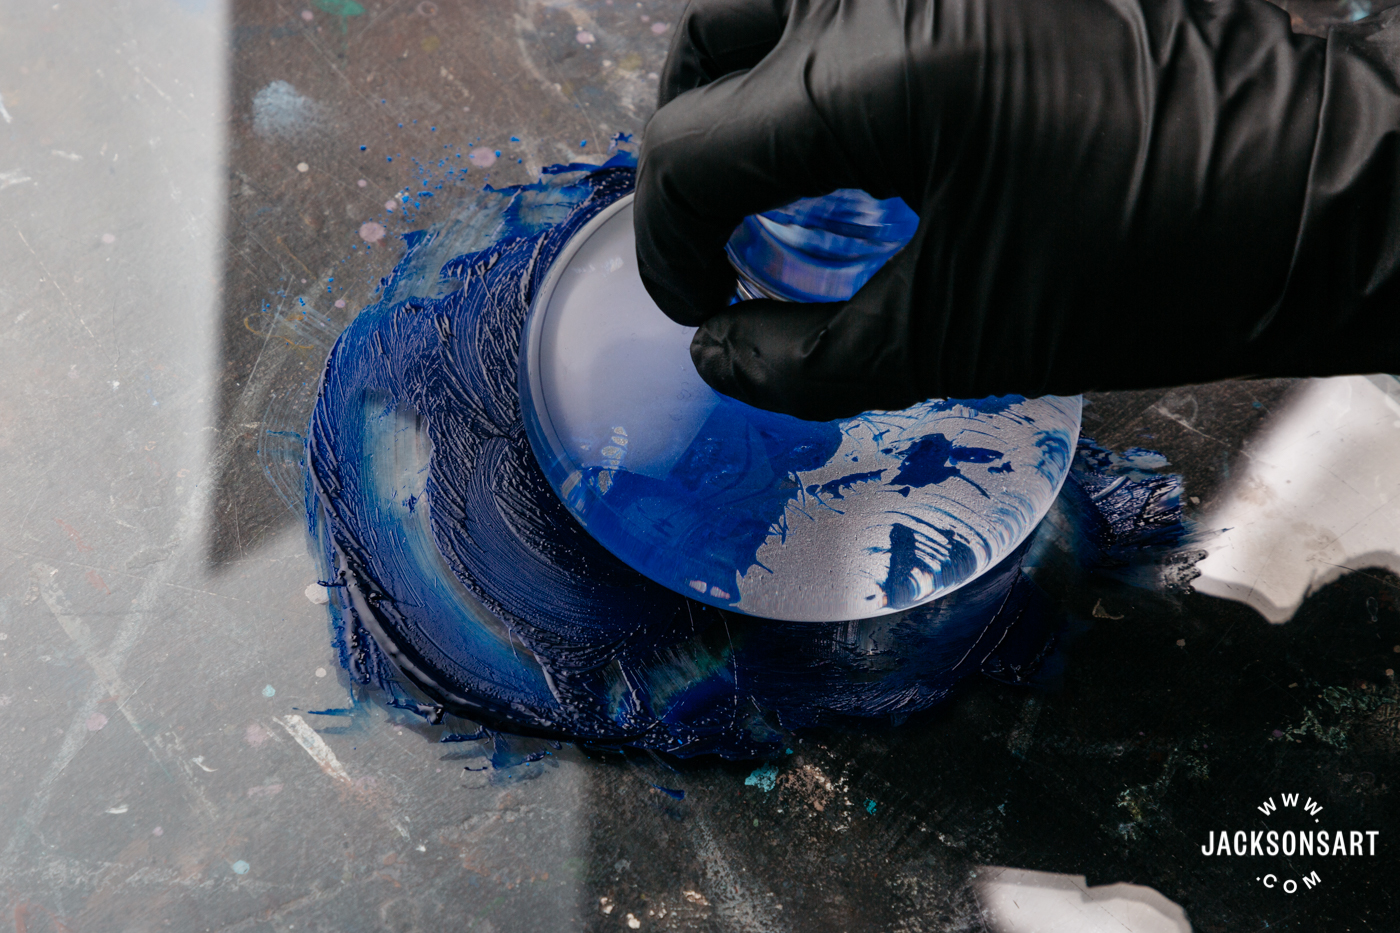
Here I am using a short handled muller with a 10cm diameter base. It works well for mulling while standing, because the grip is on top. It is made of clear glass – it looks blue because it is reflecting the colour of the ultramarine oil paint I’m making.
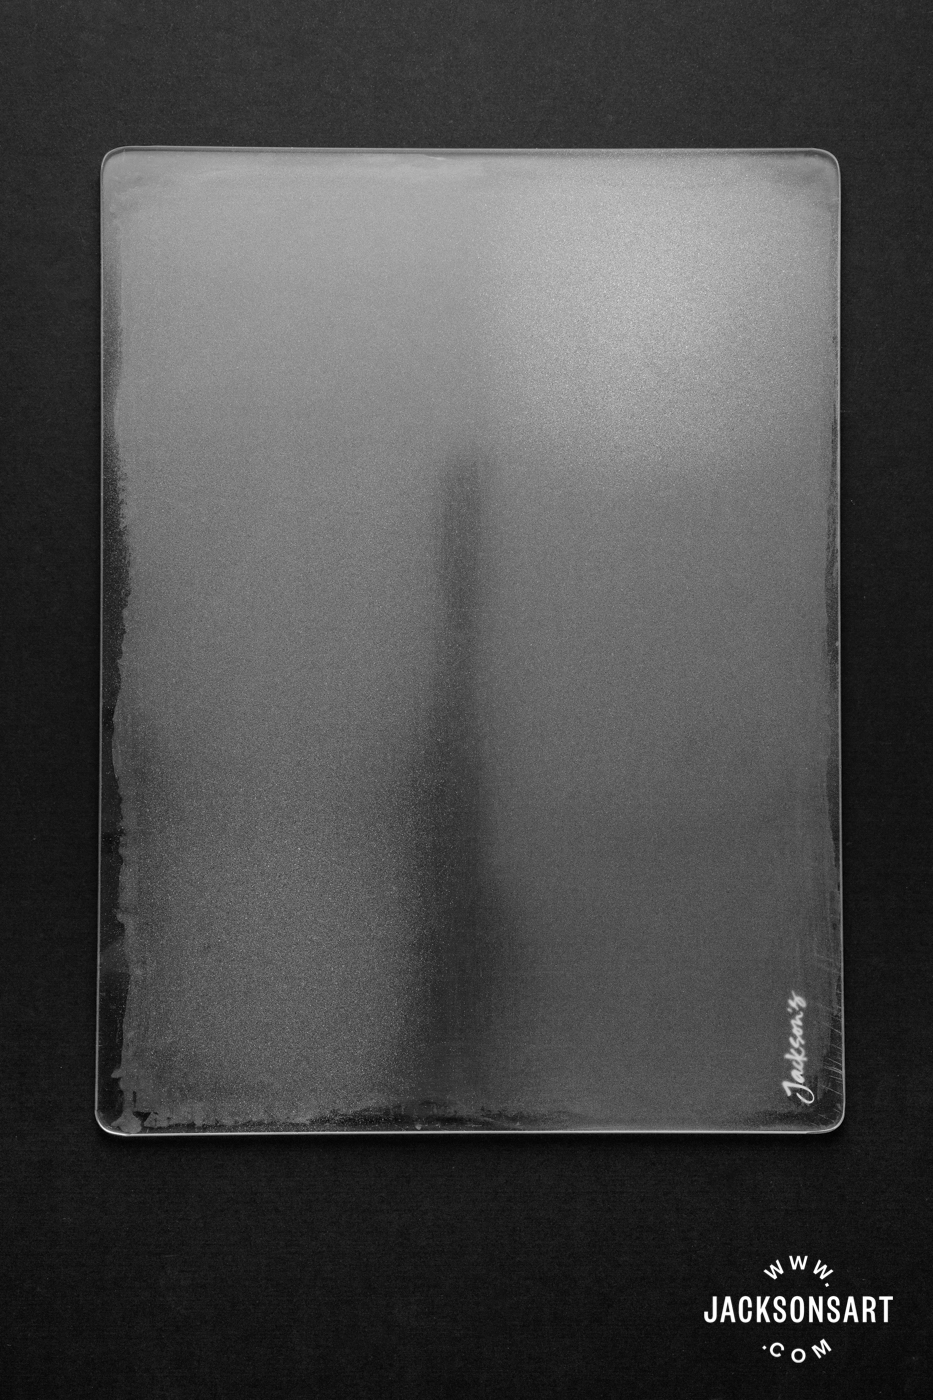
Jackson’s Glass Palette and Inking Slab
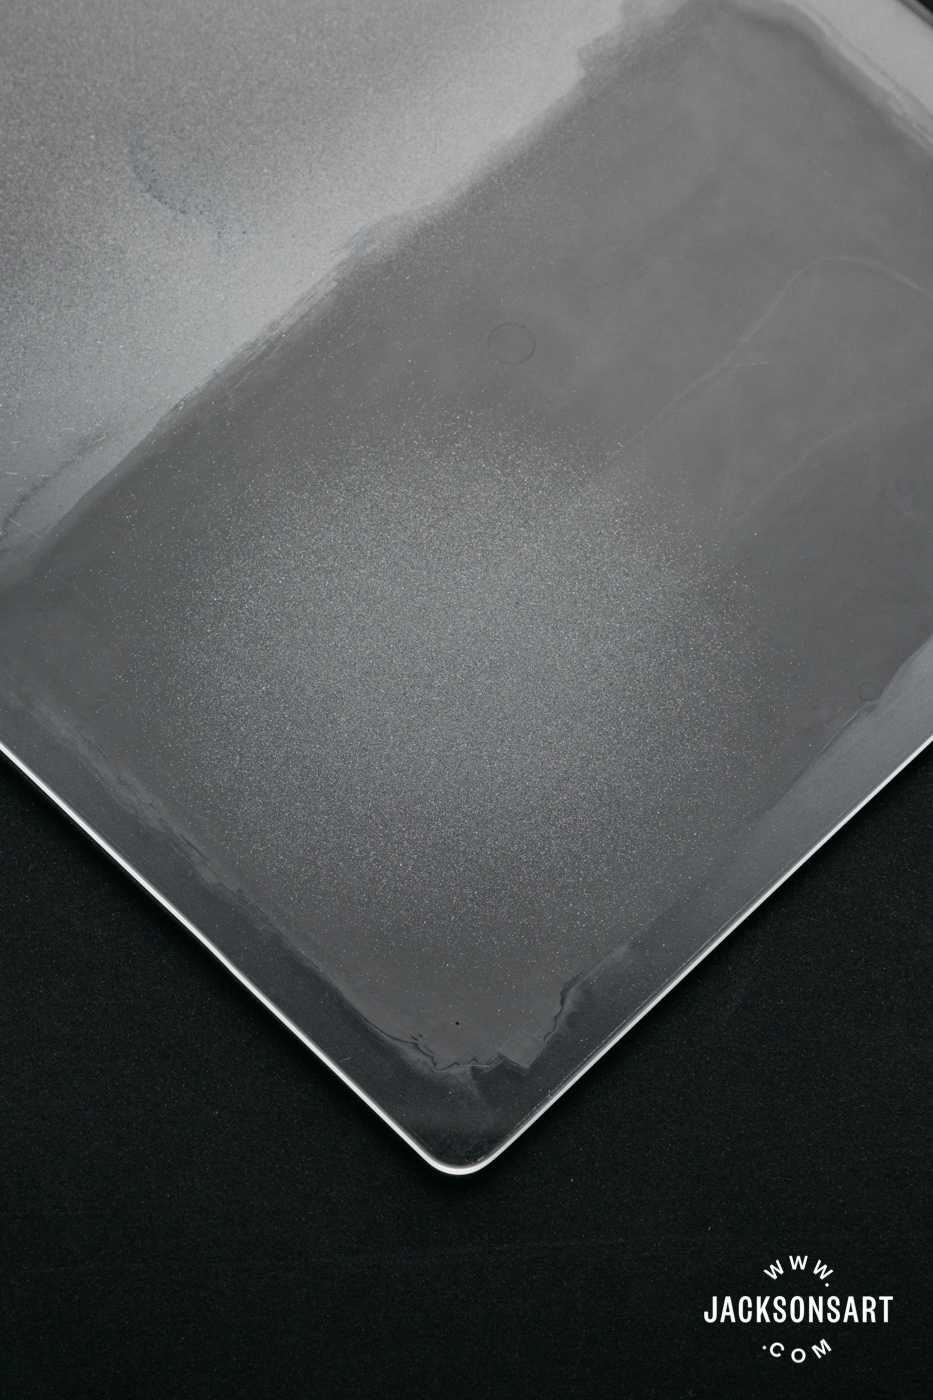
The Jackson’s Glass Palette has rounded corners and edges so there is no risk of cutting yourself when handling it. It is made of toughened glass so it is hard to break. It is great used as a slab to roll ink out on for printmaking and it’s a smooth, easy-to-clean surface for use as an oil painting palette. Because it is clear you can even put a coloured sheet of paper behind it to match your toned canvas so you can judge your colour mixing better.
Transforming the Glass Palette into a Mulling Slab
Choose the method to frost the glass – is using etching cream or grinding with carborundum better?
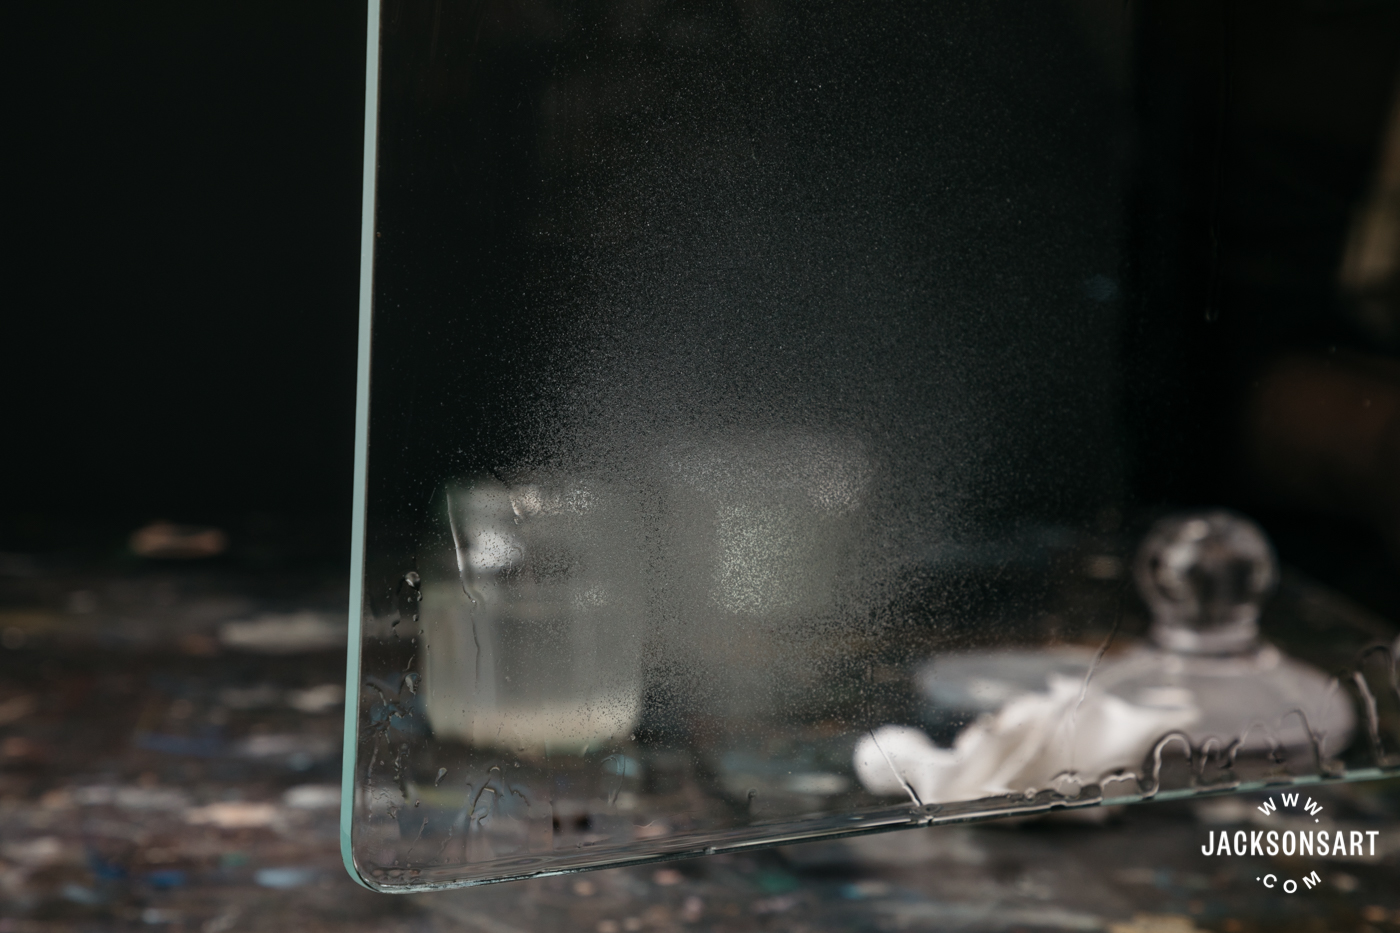
I wanted to change the glass palette to be like a sandblasted glass slab with a fine ground-glass texture matching the face of the mullers. I tested if glass etching cream or grinding with carborundum grit would be better. In the end I found that the glass etching cream was good and didn’t take very long, but the depth of the frosting was slightly less, a little uneven and you need very good ventilation because the fumes are dangerous to your eyes. The grinding with the carborundum powder gave a more evenly textured surface that was slightly more frosted, closer to the texture of the muller, but it took longer and you may want to wear earplugs. The carborundum is less expensive than the etching cream, though the etching cream can be reused for other projects. I tried making paint on both frosted surfaces as well as on the un-frosted glass palette and found both the etching cream and the fine carborundum surfaces worked well, though the carborundum surface more closely matched the surface of the muller. Using the muller on the smooth, un-frosted glass slab took so much longer to make the paint that it was frustrating. So I recommend choosing one of the methods to frost the glass. (If you are interested in the details of the testing, they are at the end of the article.)
How to Etch a Glass Palette with Etching Cream
This is faster and quieter than grinding with the grit, but the fumes are dangerous for your eyes, so it’s best to do it outdoors.
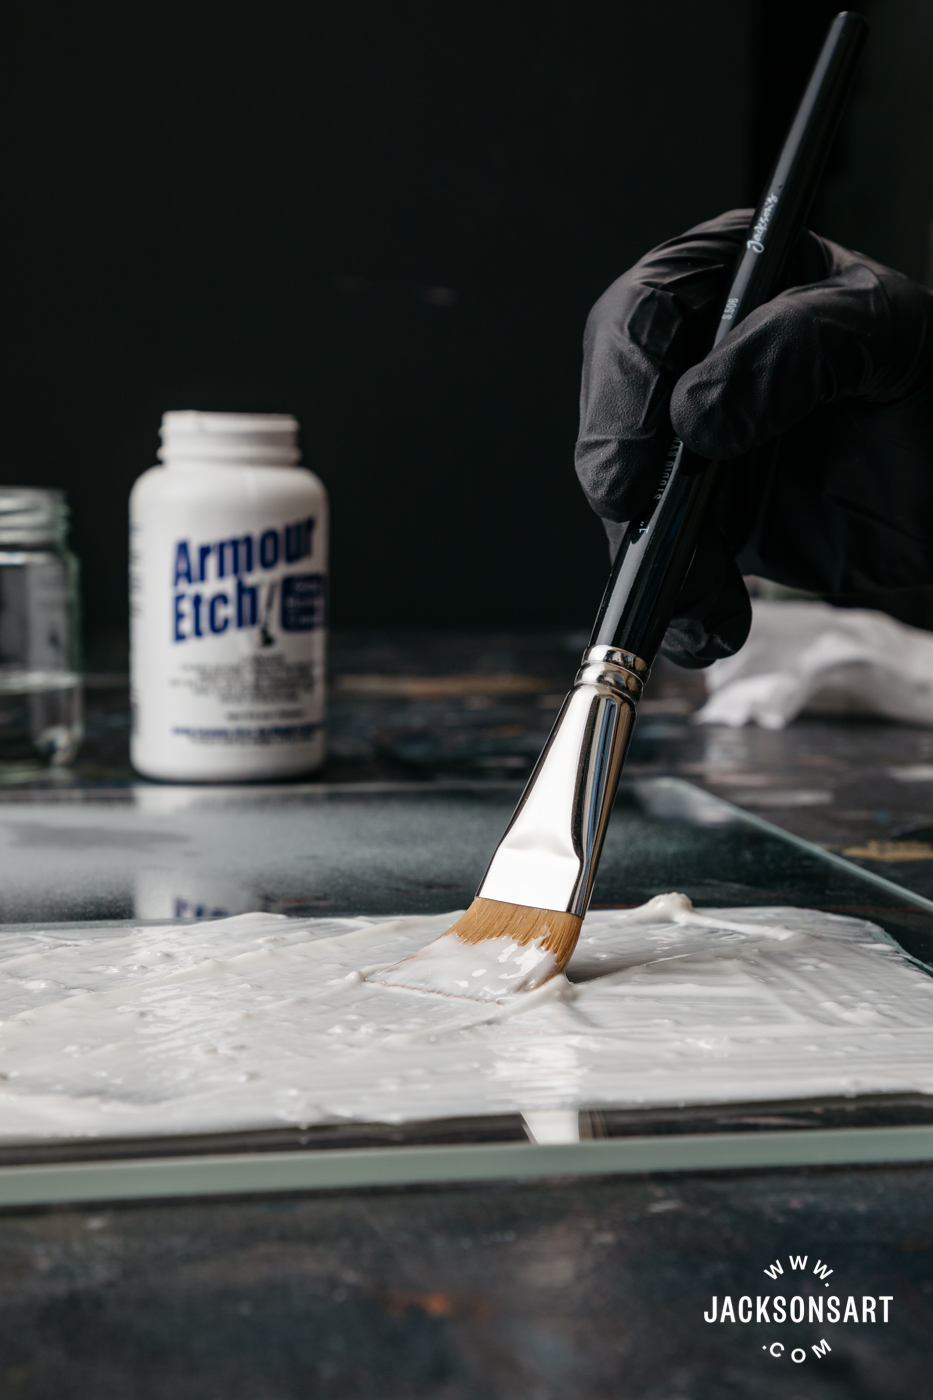
1. Warm and shake the jar
The Armour Etch Glass Etching Cream doesn’t work well if it is below 18C/65F, so it helps to warm it up a bit. I put the closed jar of cream in a bowl of very hot water from the tap. You don’t want to melt the plastic jar and you only need to get it warm, not hot. I left it for 15 minutes while I cleaned the glass and prepared the area outdoors for applying the cream. Shake the jar well.
The cream contains crystals, that when warmed and shaken, were supposed to melt but there were still chunks of crystals. (This didn’t cause a problem when painting it on but did when I tested using a squeegee and the chunks dragged streaks through it.)
2. Set up your working area outside
To protect your eyes from the fumes, do this project outside. Set up an area with some newspaper. I used a 1-inch wide synthetic watercolour brush and the brush didn’t seem affected by the cream. You will need a timer and gloves (and eye protection if you have it).
3. Clean the glass
The glass must be very clean. Any oil, fingerprints or window cleaner will repel the cream. So I cleaned it with window cleaner and then washed it in water and dried with a lint-free cloth. You can also clean it with alcohol or acetone.
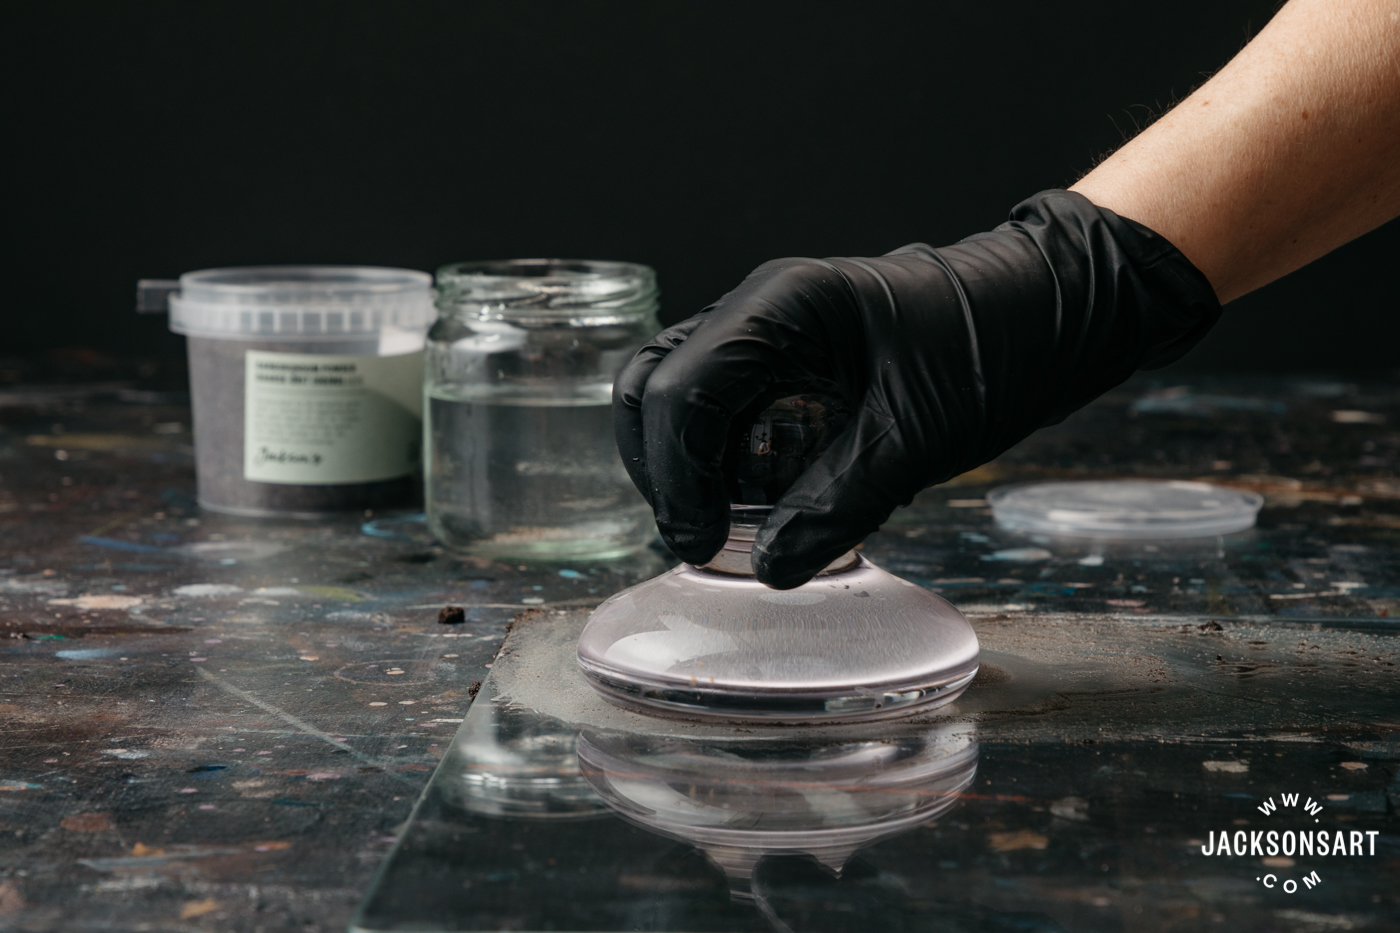
4. Set a timer and apply the cream
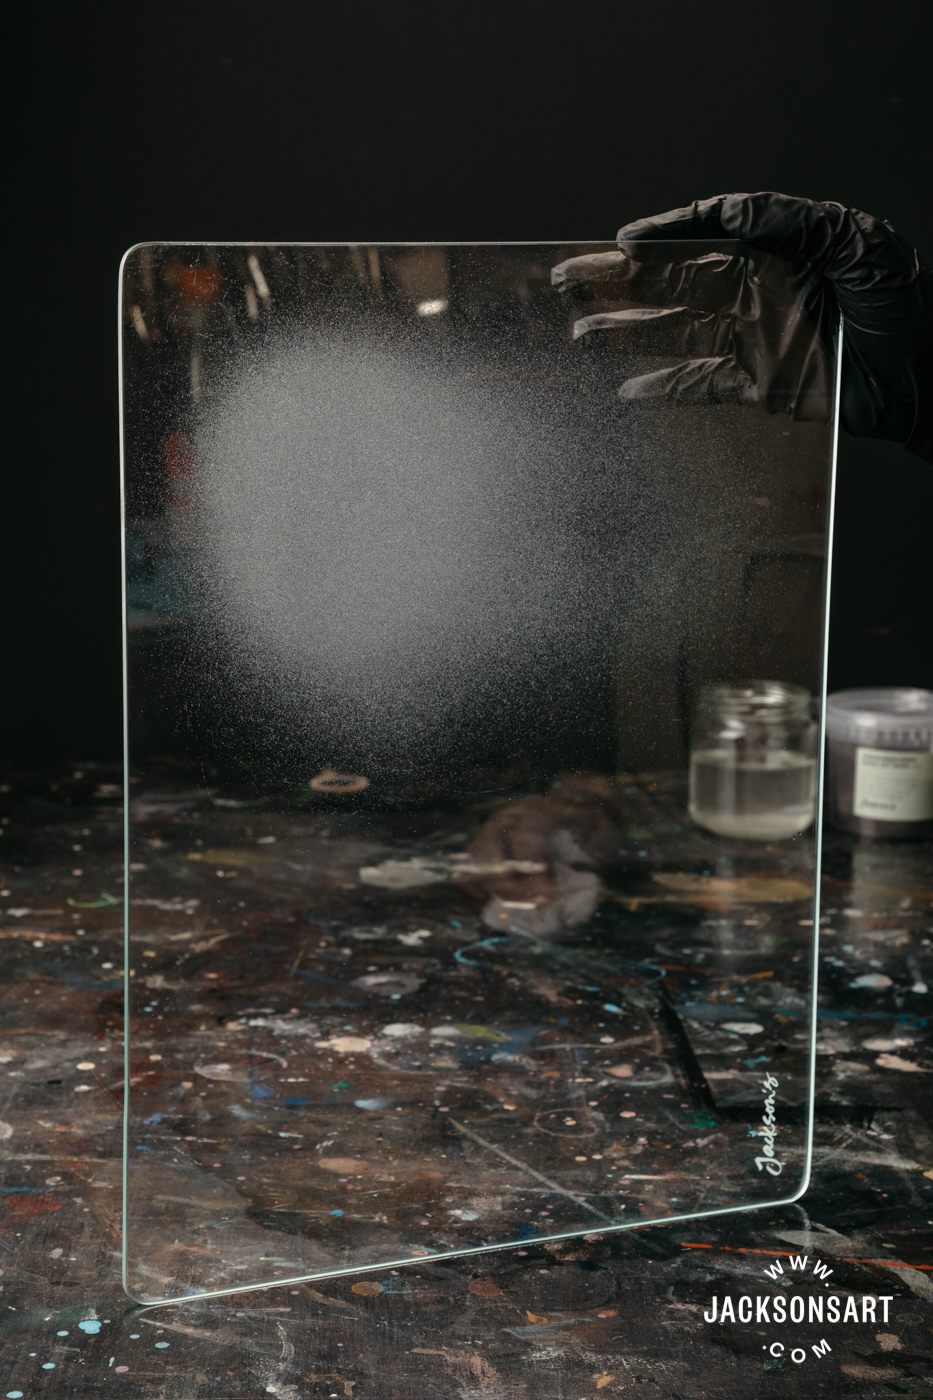
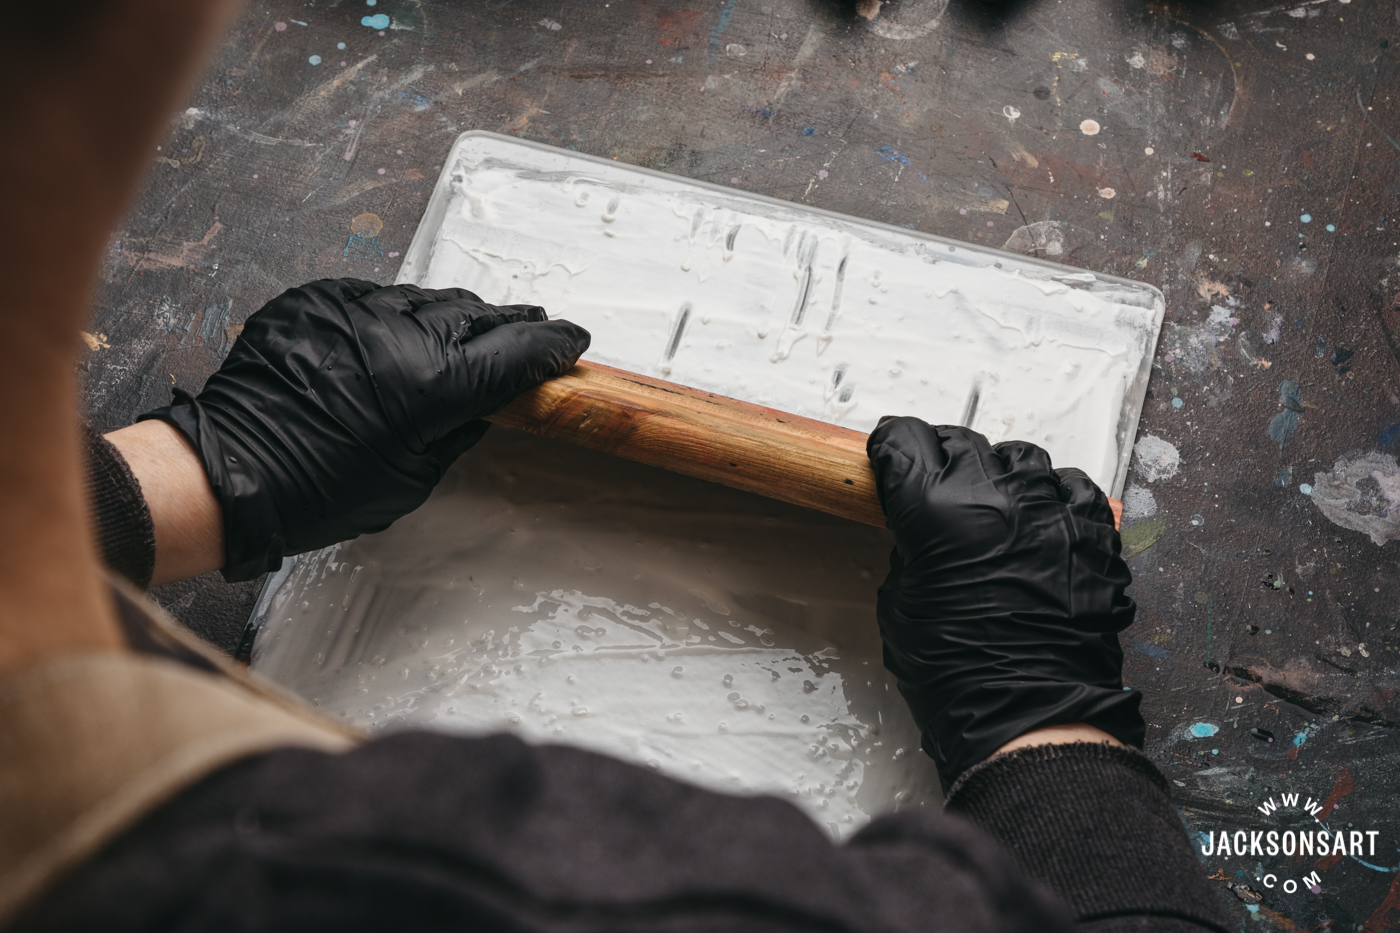
Go to your prepared outdoor area and put on gloves before you open the jar. Shake the jar well. Since you will just be using a circle in the centre to make your paint, you only need to frost a large circle in the glass, not the whole slab. Set your timer for 10 minutes when you start and brush on the first thin, even layer very quickly, in under two minutes. Then slather over that a thick layer – at least 2 cm or until you don’t see any dark shadows through the cream. It should take almost half the 10-ounce jar. The cream works by fuming it, so it needs a thick blanket of cream left on. They recommend to continue brushing and moving the cream around on the surface for the whole 10 minutes, I did this but don’t know if it made any difference. Since this is a paint making tool, it doesn’t need to look perfectly even anyway.
5. Remove the cream
After 10 minutes, scoop it back into the jar to use for another project or to give to a friend, it is still full strength and can be reused many times. Then wash your palette off in the sink. It is evidently safe to go down the drains, like drain cleaner.
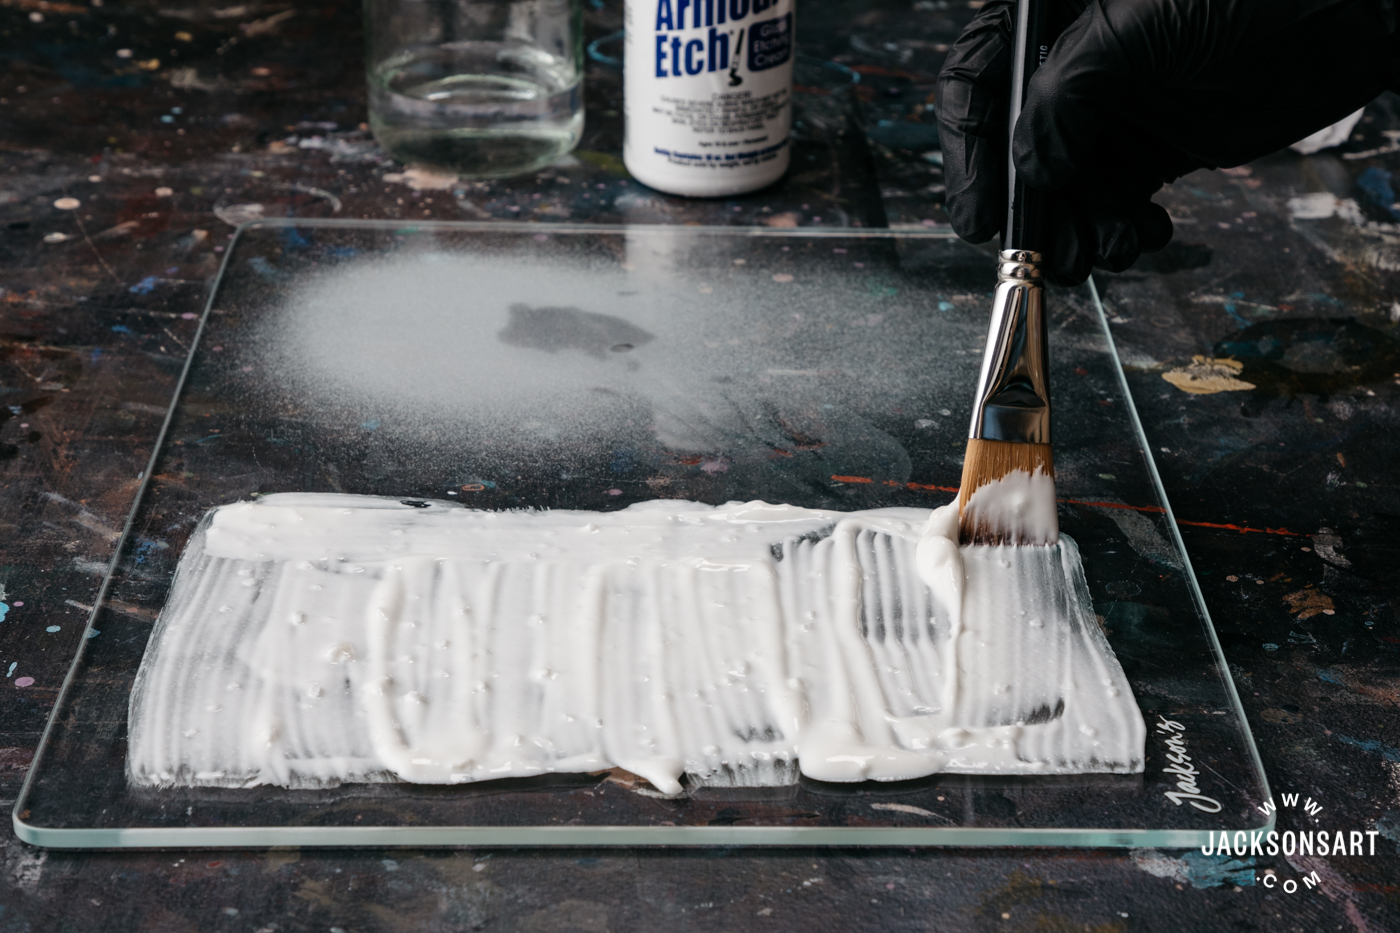
This shows me testing an area of the palette by etching with the glass etching cream. But you will probably want to etch a large circle in the centre of your palette.
How to Grind a Glass Palette
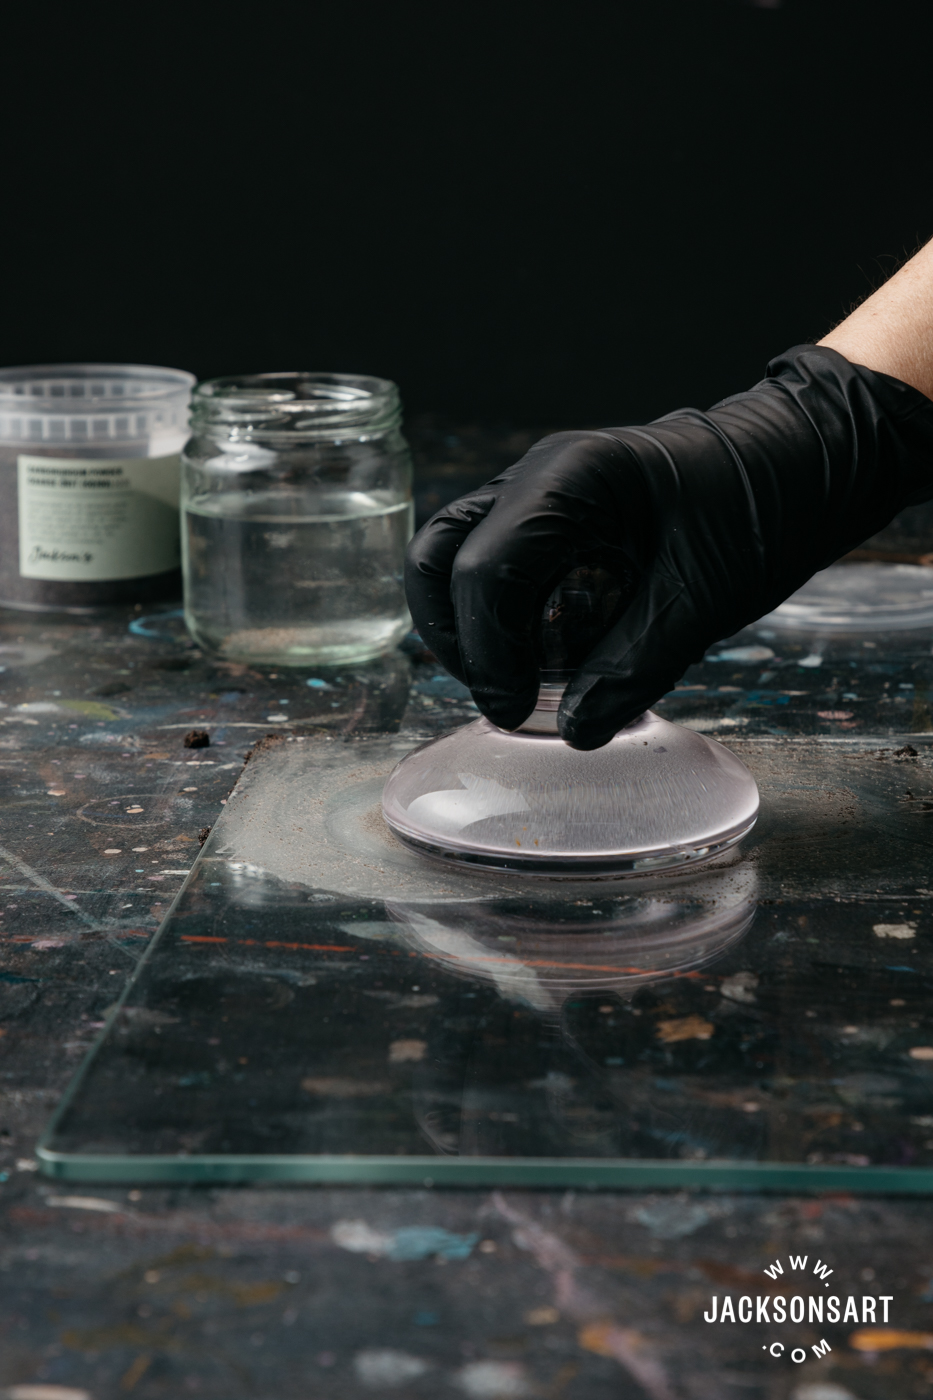
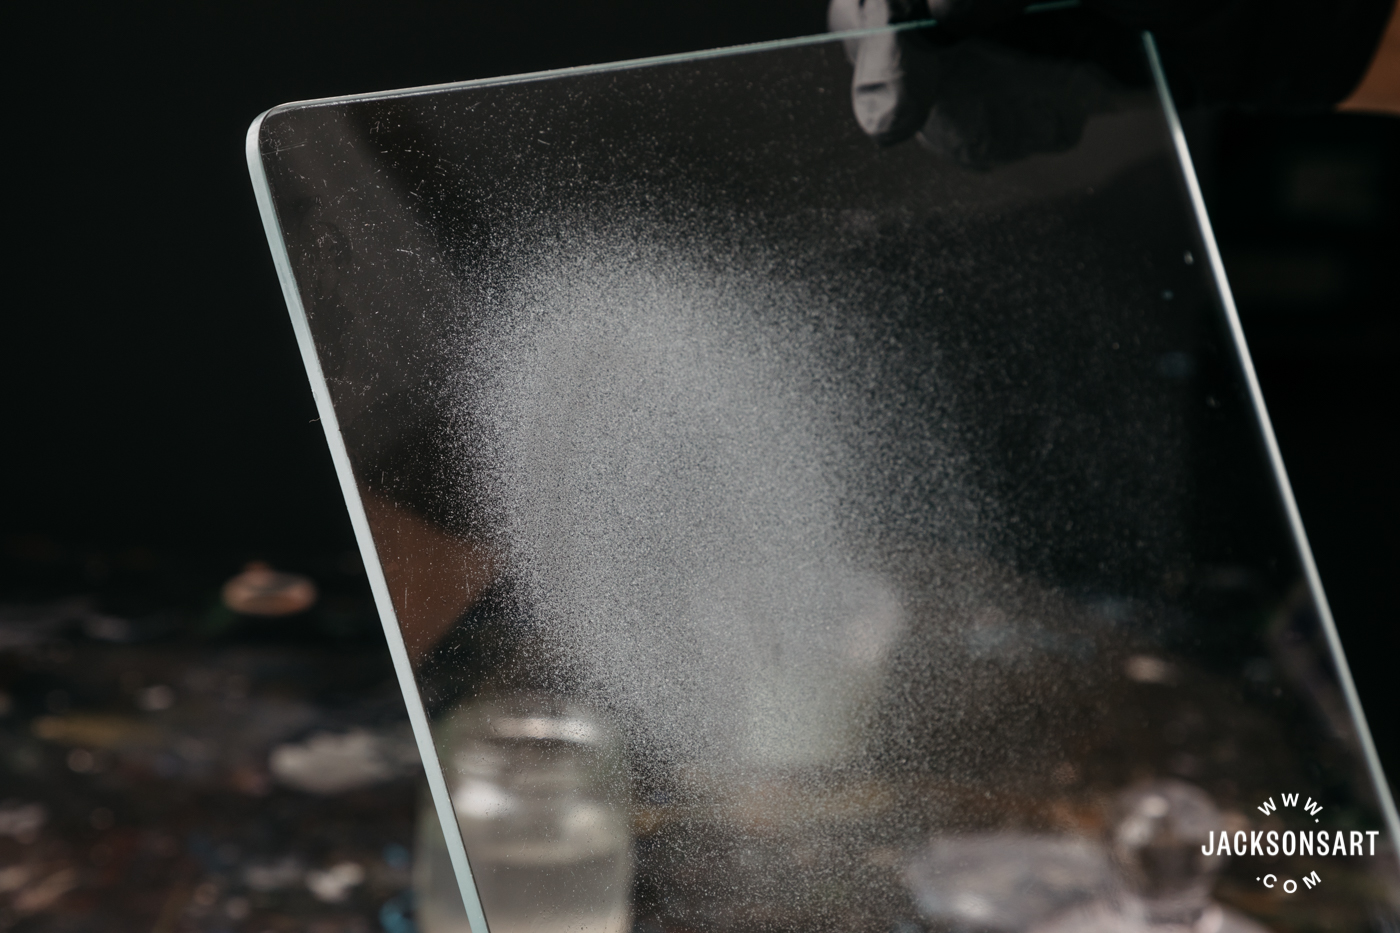
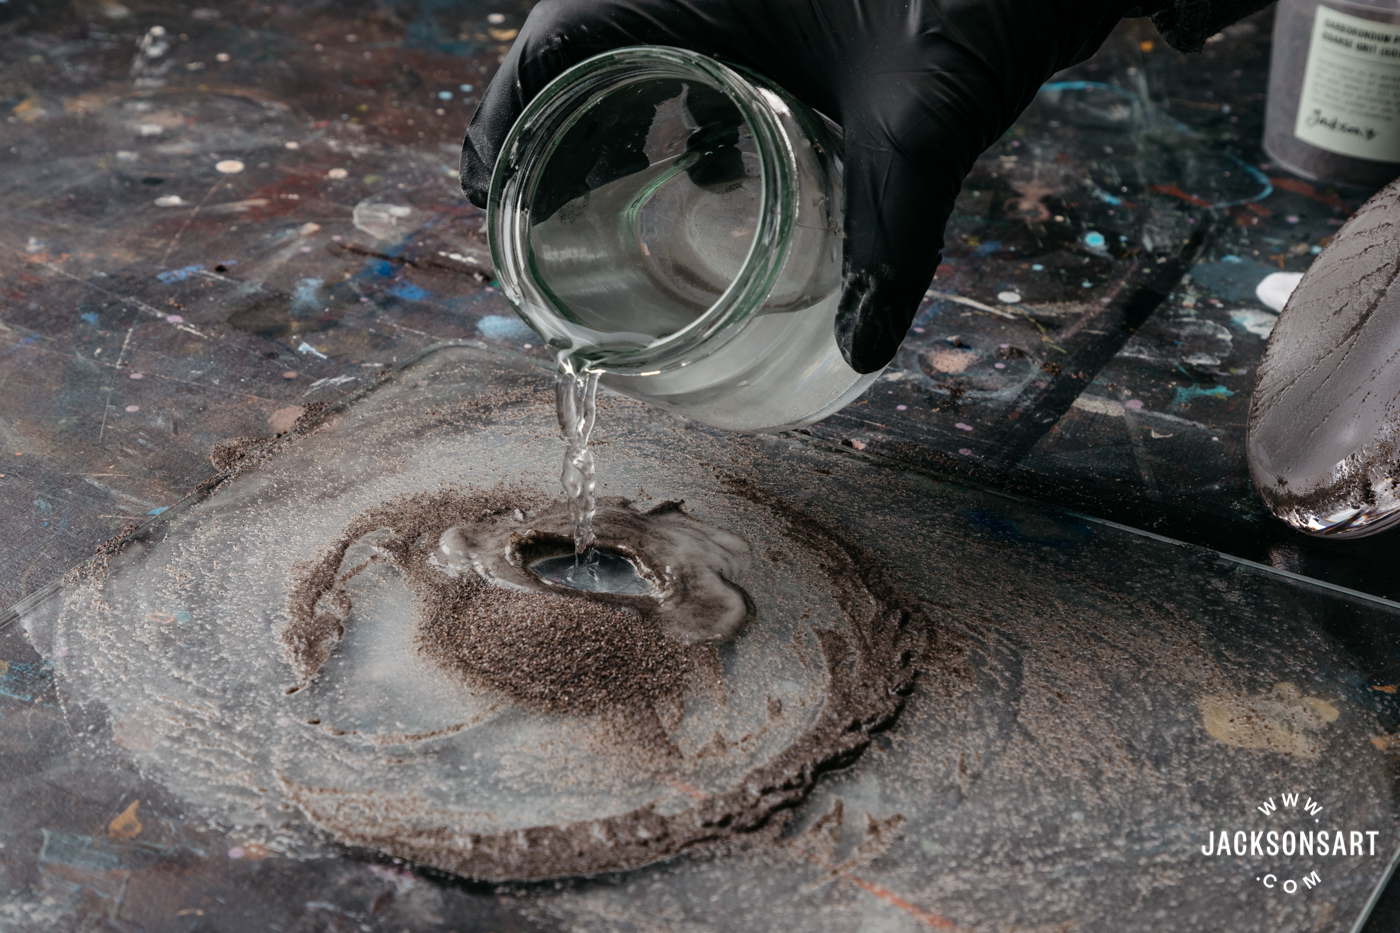
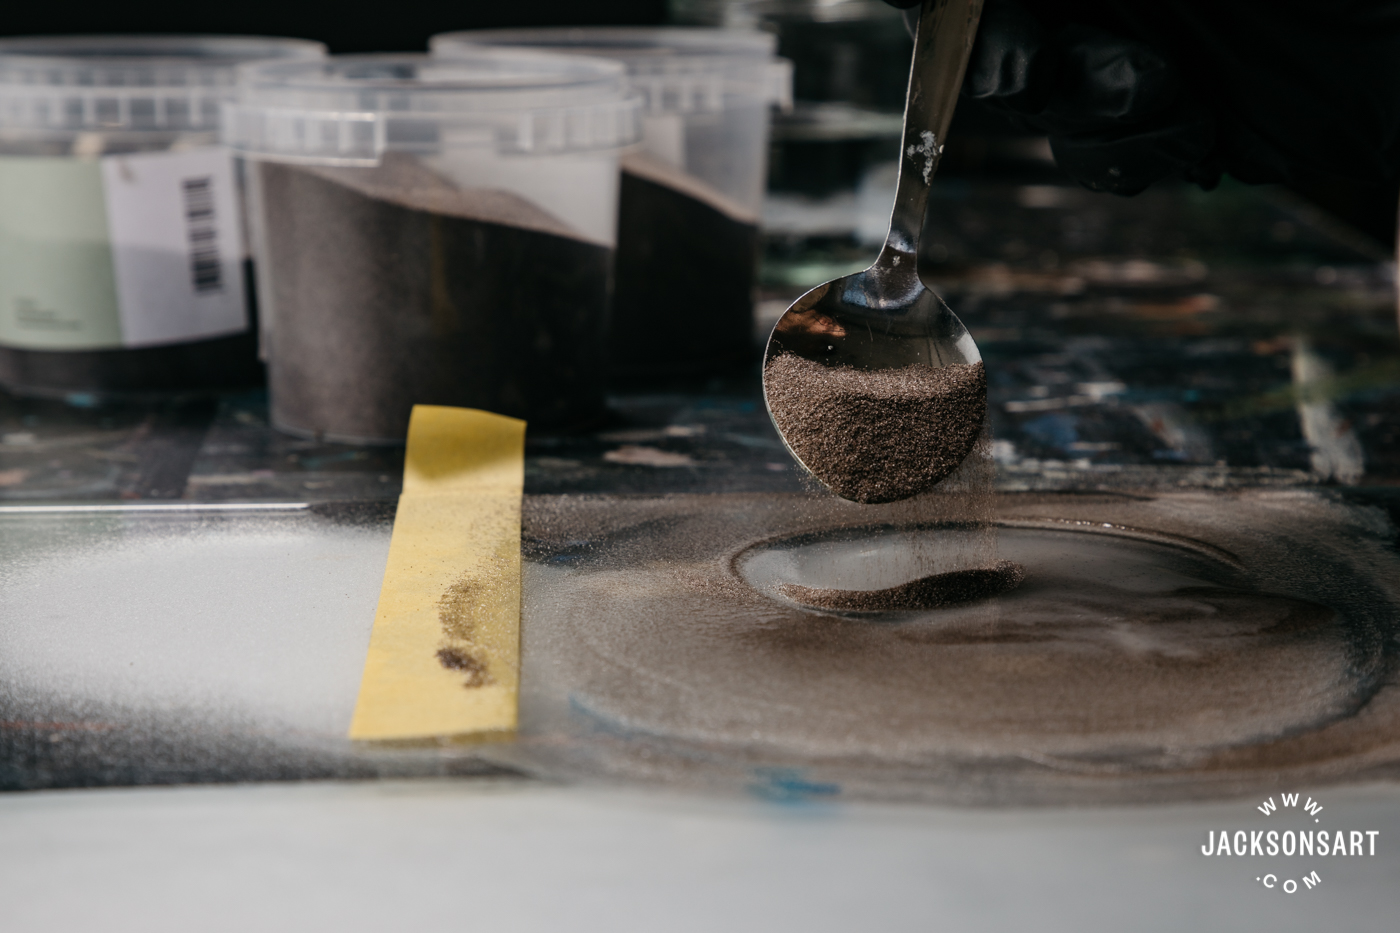
Silicon carbide, also known as carborundum, is a hard chemical compound containing silicon and carbon and is mostly used as an abrasive. It is also used in some forms of printmaking, see more about that at the end of the article. An inexpensive 500g pot of Jackson’s Carborundum Powder in Fine grit will be more than enough to frost the Jackson’s Glass Palette. You can create a large circle of frosted glass in the centre in about 30 minutes. Be warned: this is a loud and monotonous activity. You will disturb others if they are around. You may wish to wear earplugs. Working on a large area of newspaper will let you clear up a lot faster and contain the ground glass bits that will be made. If you dampen the paper it will also keep your glass slab from sliding around as you work on it. Put a spoonful of grit on the palette and add enough water to make a very wet slurry. Place the muller on top and begin rotating it in a big circle, and small circles and in a figure eight. I did not press hard. Add water as needed to keep it very wet and gliding easily and add more grit as it breaks down or runs off. I also scooped some back on, that had piled up off the edge. Depending on how hard you are pressing, how fast you are swirling and how much water there is, it may take about 15 to 30 minutes of grinding. The time goes by slowly so check a clock, 5 minutes can feel like 15. You cannot see if the grinding is causing any change to your slab because when the ground glass is wet it is clear. You can only see the frosted effect when it is dry. So you will need to wipe an area clear of grit and then dry it with a paper towel to see if it is sufficiently frosted. Since you will be using a circle in the centre of the slab to make your paint, you only need to frost a large circle in the glass, not the whole slab. Note: This process does not damage the muller. Note: I wore gloves because the process will produce powdered, ground glass and I wanted to be sure I didn’t collect any on my hands or under my nails.
Grinding the glass with a very wet slurry of fine carborundum.
Adding more water to keep the slurry wet.

Adding more grit as needed.
After just a couple of minutes.

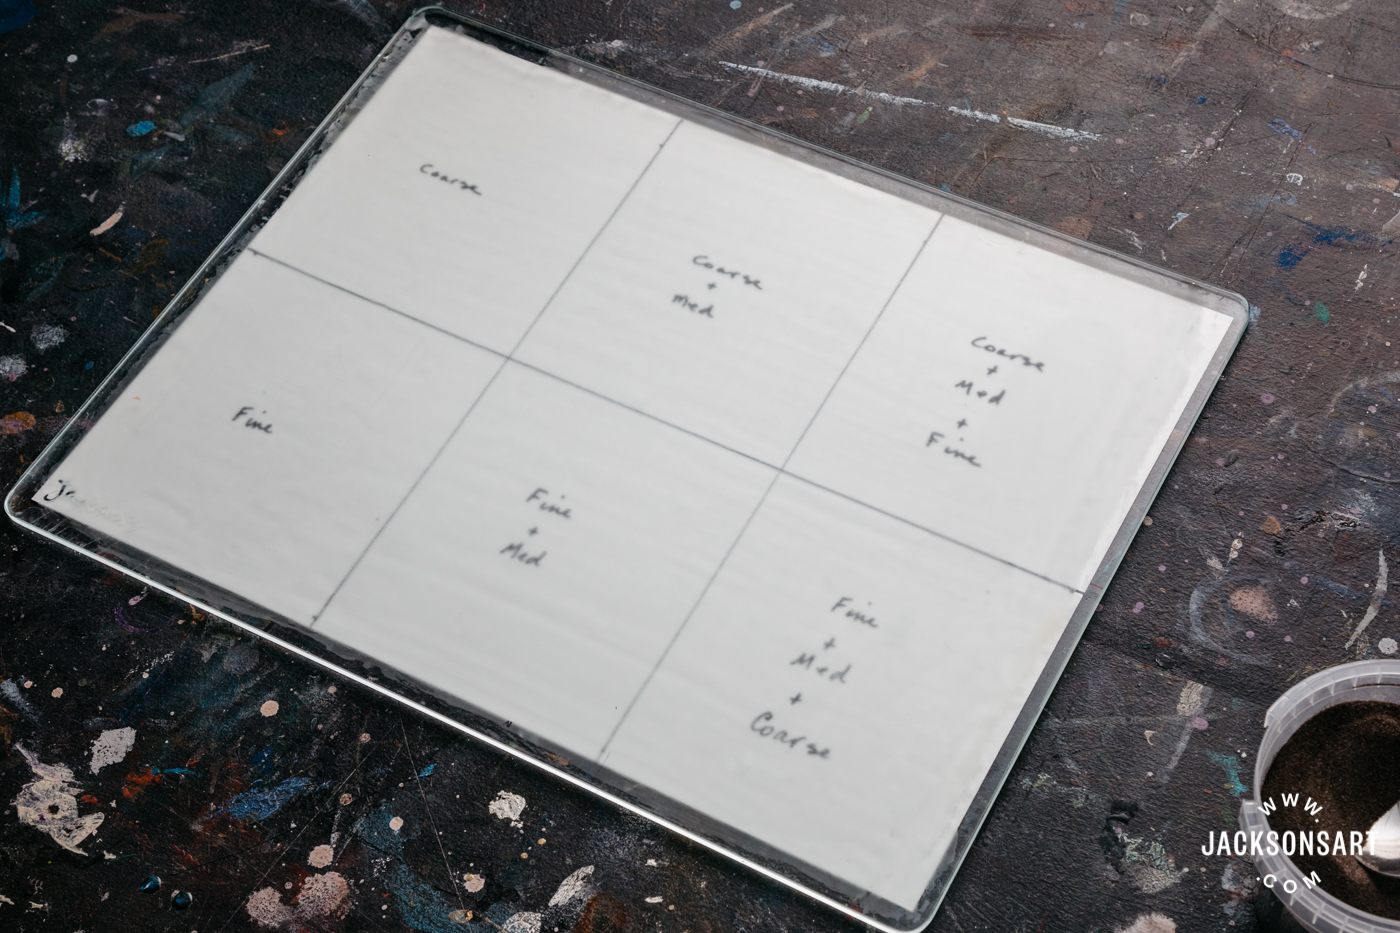
This took me about an hour to grind. But I ground the whole rectangular surface and did it in 6 equal sections each with a different grit or a series of grits in each section, to find the best result. You can see that the upper right section was more coarsely ground, which turned out to not match the surface of the mullers as well as the fine grit on the upper left.
Cleaning up: I couldn’t find anything warning against putting the grit down the drain. But since it is like very heavy sand I didn’t want it to fill up the U-bend or something, so I got most of it off into the bin before I washed the slab in the sink. A microfibre cloth easily picked up all the particles from the table, but a paper towel couldn’t do it. Since the grit will contain lots of tiny particles of ground glass, be sure to get it all cleared up and you may wish to bin the cloth afterwards. Working on a disposable surface like newspaper or a drop cloth will help contain it all.
Whichever way you choose to frost the glass, your new grinding slab can now be used to make oil paint or watercolour paint. If you are interested in making your own watercolour paints we have this article: Making Handmade Watercolours with Jackson’s Artist Pigments. Below is an introduction to making oil paint.
Part 2 – Making Handmade Oil Paint
Why Make Your Own Paint
One reason you might want to make your own paints is to ensure that you know what is in your tube of paint. Unlike food or cosmetics, artist materials do not require a list of ingredients and the list that is voluntarily put on some materials is often only a highlight of the main ingredients, not listing the rest. Some artists also enjoy the satisfaction of making paint from scratch and then making a painting with their own paint. Also, when you make it yourself you can customise the colours and textures. If you find an inexpensive source of pigment, you might even be able to save money making it yourself. Some artists even gather their own pigments from nature to make paints.
How to Make Oil Paint by Hand – an Introduction
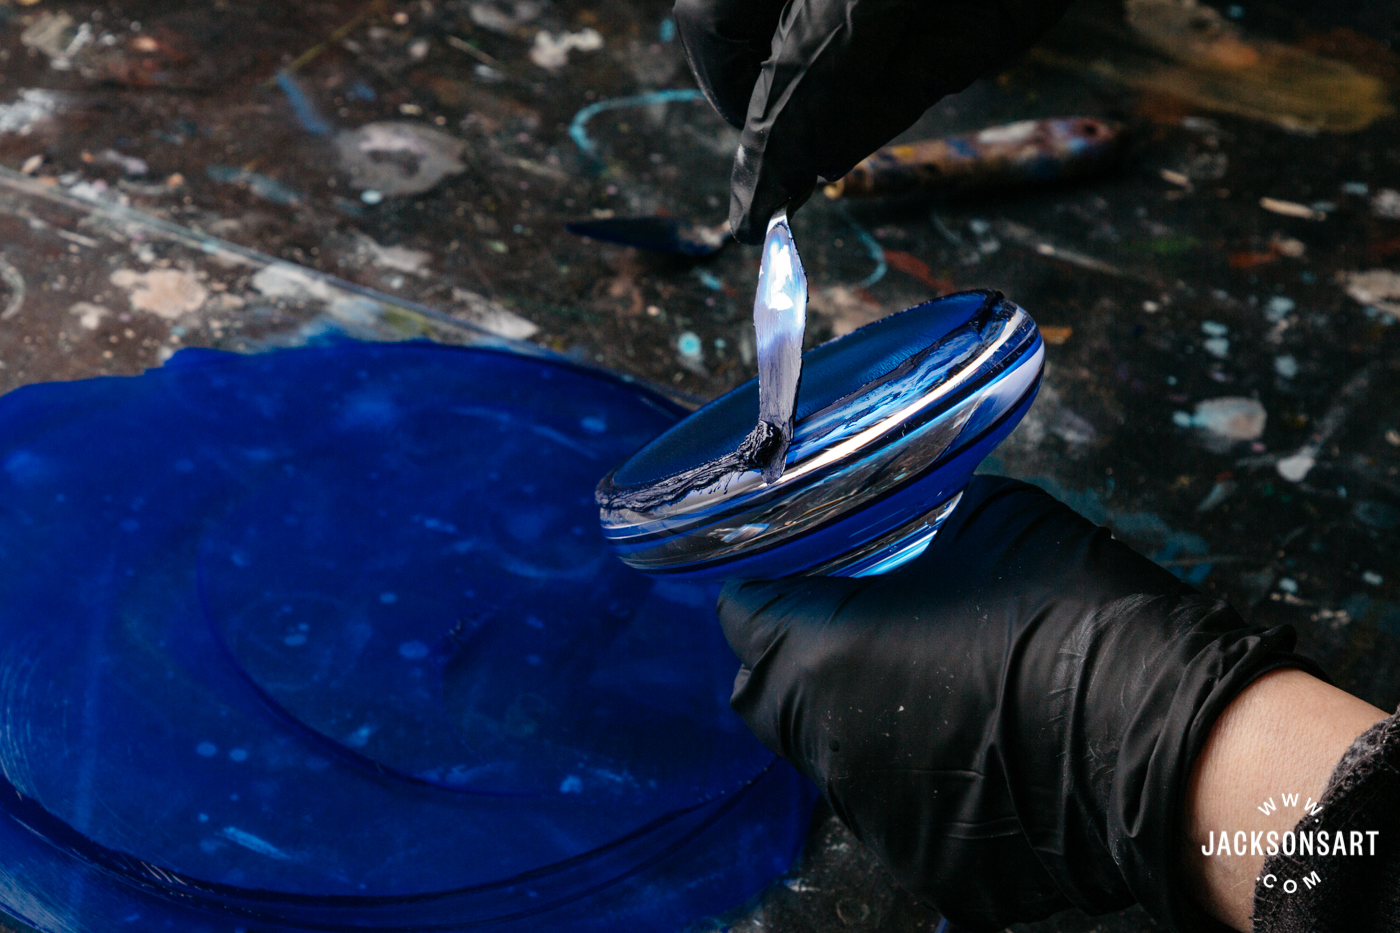
To make oil paint by hand you rub a hand-held glass muller over a drying oil and dry pigment on an etched glass slab to encapsulate every particle of pigment with oil. With the mulling process you are not milling the pigment, which is grinding the pigment into a finer powder. It already comes as a fine powder of the appropriate particle size. With mulling you are combining the oil and powder until every particle of pigment is fully coated. Most of the time and expense of making any oil paint lies in the meticulous care taken in coating each particle of pigment with the drying oil.
You can make paint with just a palette knife, but it takes a long time to get the paint smooth and to coat all the pigment with oil, and you usually have to use the paint the same day or it will separate. If you want to make a batch of paint and store it in tubes, then mulling is essential. It combines the pigment and oil better so there is less chance of them separating in the tube. You can use a muller on a smooth glass slab, but it takes much longer than mulling on an frosted glass slab, which is much faster at making the paint smooth.
The drying oil binder is usually linseed or walnut oil or in the case of whites and pale blues, safflower or poppy oil. (There is a link at the end to read more about drying oils.) The oil holds the pigments together as a paint film, so it is important to have enough oil to form a strong film. But oil is a slow-drying binder because it hardens by oxidation (absorbing oxygen from the air) and not by evaporation. Having too much oil will mean that the paint can take years to become even touch-dry. You also want paint that is thick enough to pick up on a paintbrush and an excess of oil will make it runny. Also, having as much pigment as the oil will hold, means that the paint will yellow less as it ages, because the oil is the part that yellows, and a good pigment load can cover over that yellowing.
Every pigment is a different chemical and absorbs a different amount of oil. The amount can vary widely. Each pigment is ground to a size that shows it at its best, so they are all ground to slightly different particle sizes. And some are ground to a selection of different sizes to change the transparency or shade and get a few different colours from one pigment.
When making oil paint, there is an optimal ratio of pigment to binder for each pigment. Some art materials books give charts of the oil absorption of different pigments, but because each pigment can be ground differently and be from a different source, these charts give wide ranges that means they are not very useful. If you want a chart, it is best to make your own chart using the specific pigment you are using. Doing it by weight is most accurate so if you are measuring, then you will need a scale. Weigh your palette and then add 100g of pigment, then add your oil very slowly, working it with a palette knife until it forms a stiff but workable paste. The weight of oil you use for 100g of each of your specific pigments, will be the general oil absorption level, which can be used as a starting point each time when making your own paints. Then you can make slight adjustments by adding a drop more of oil or a bit more pigment if needed.
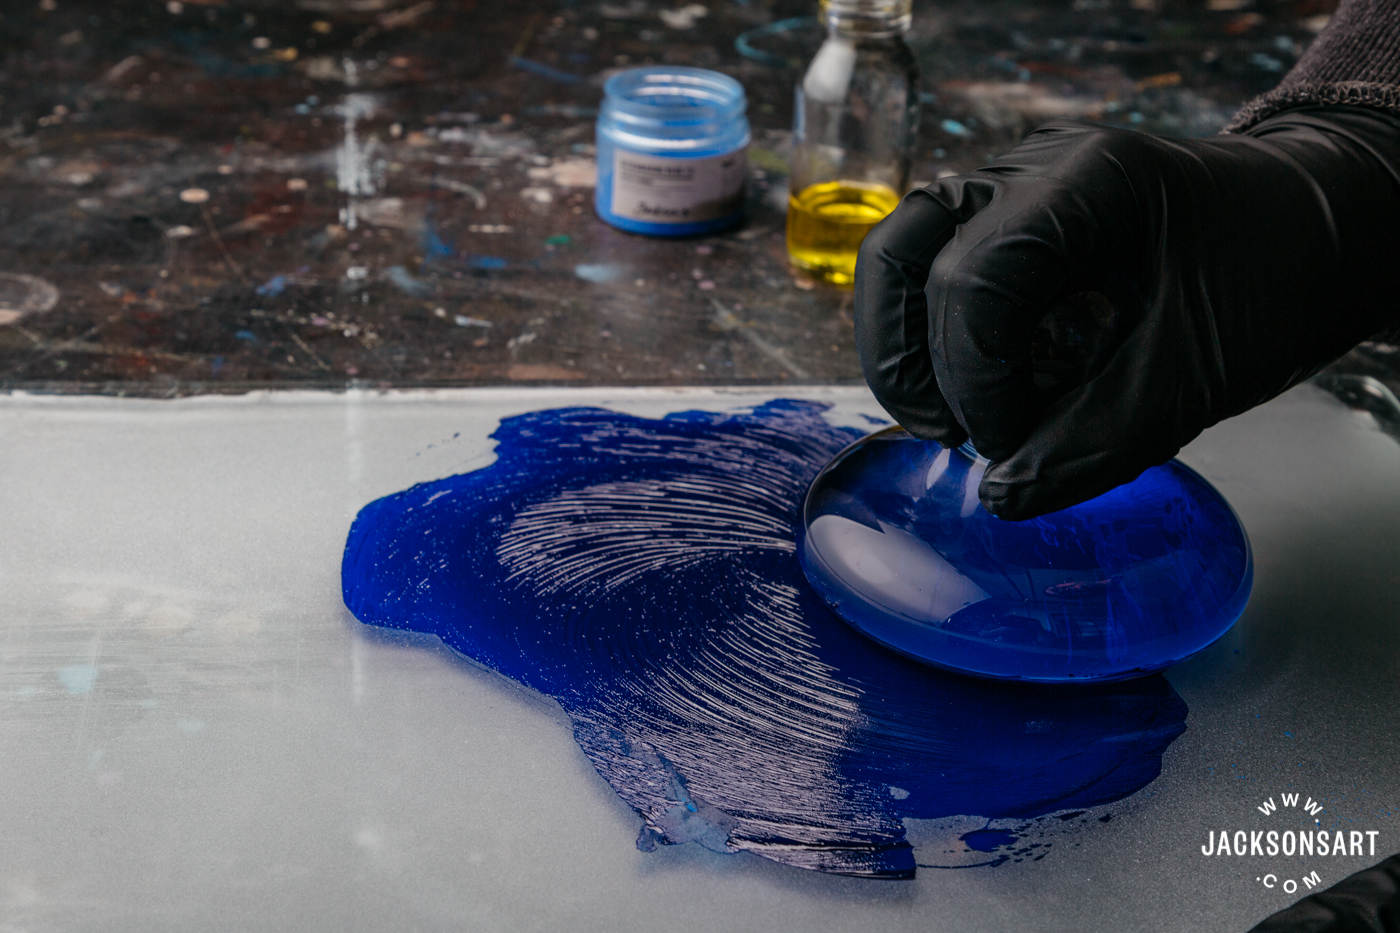
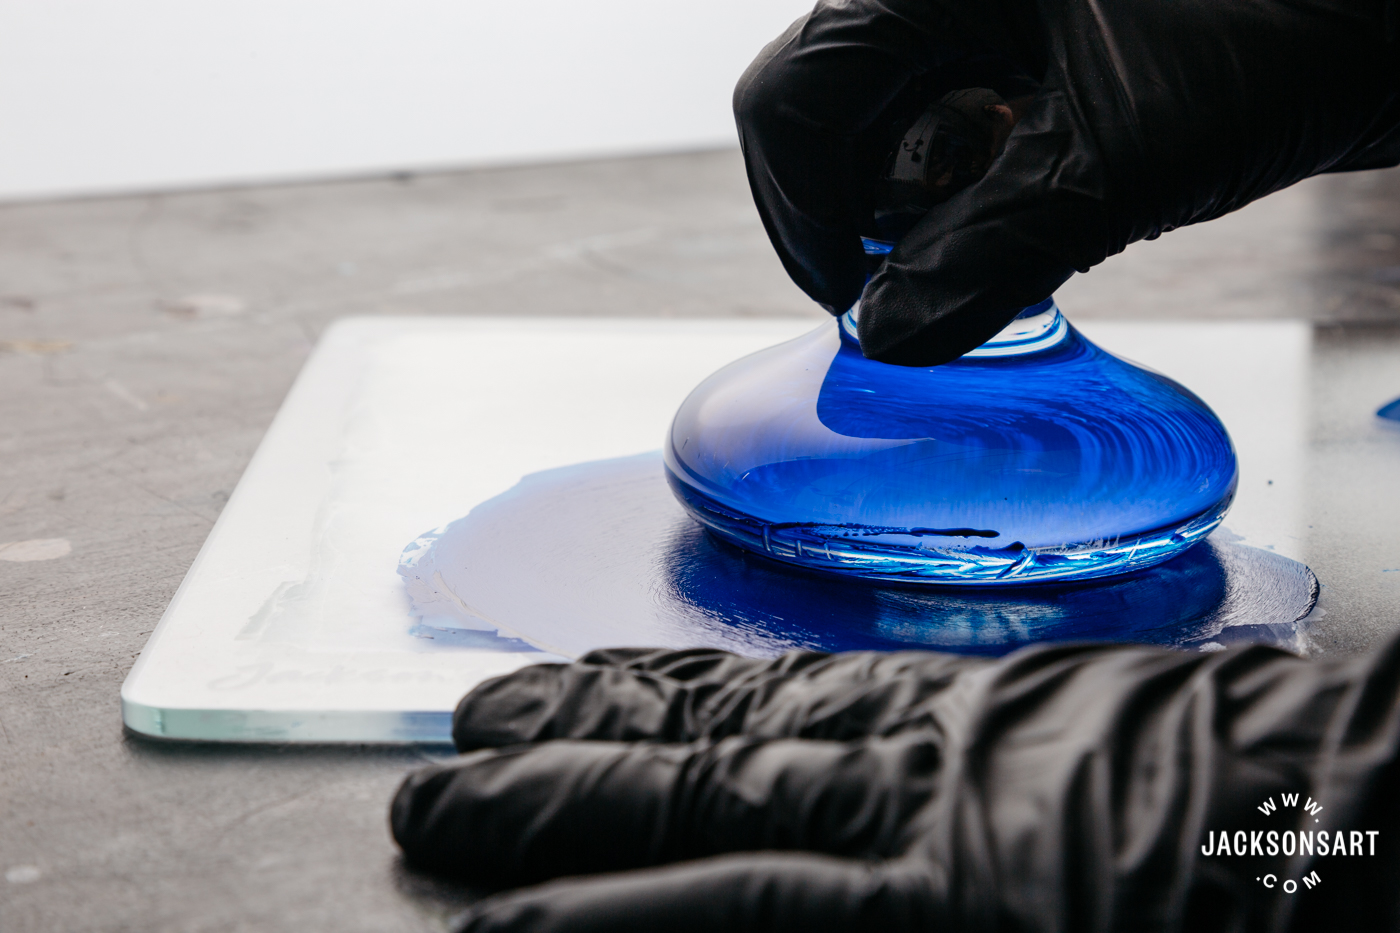
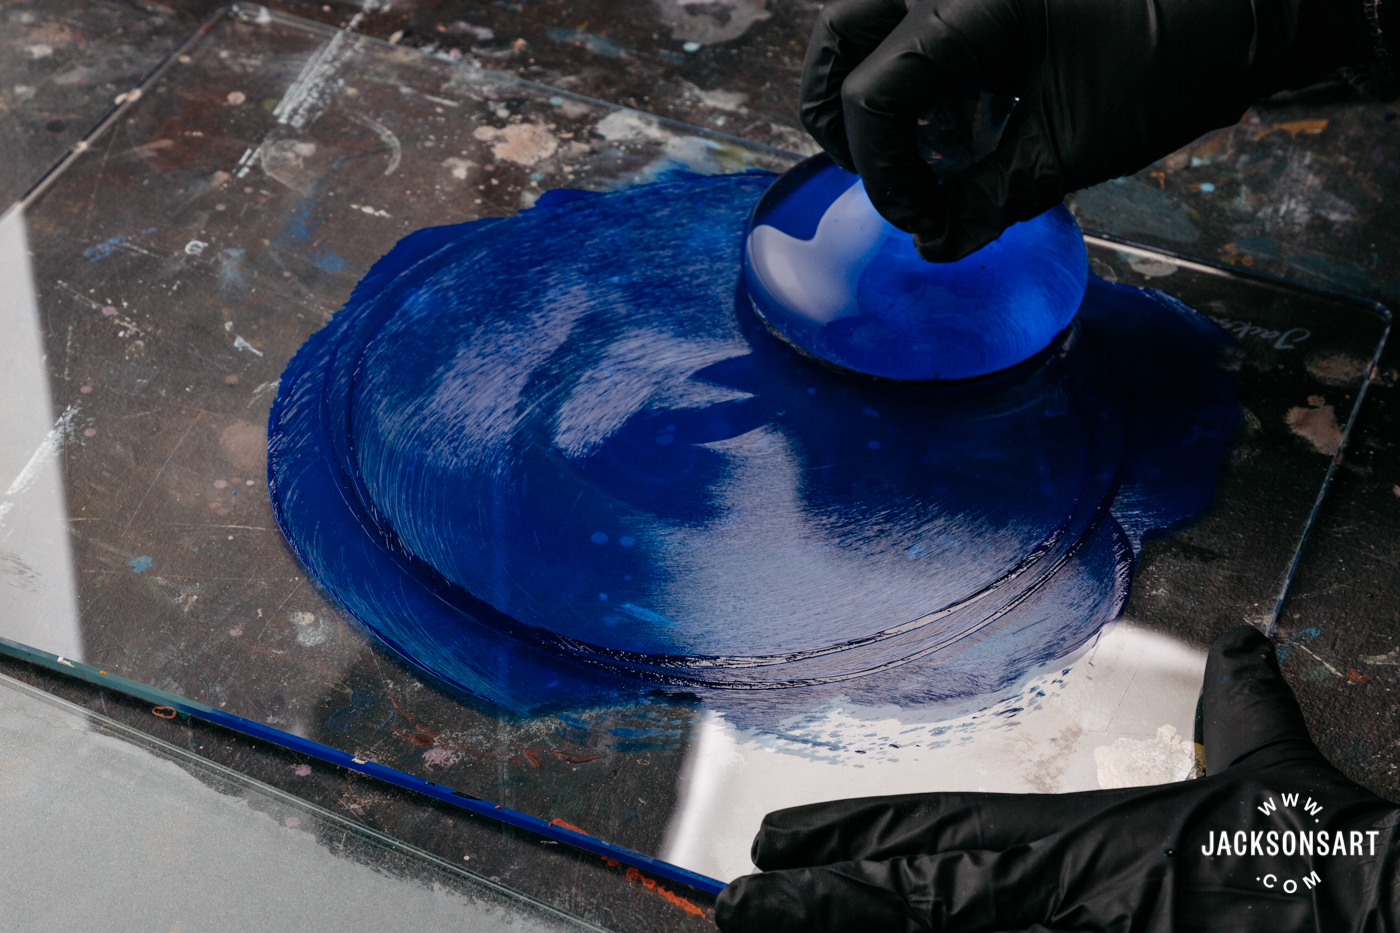
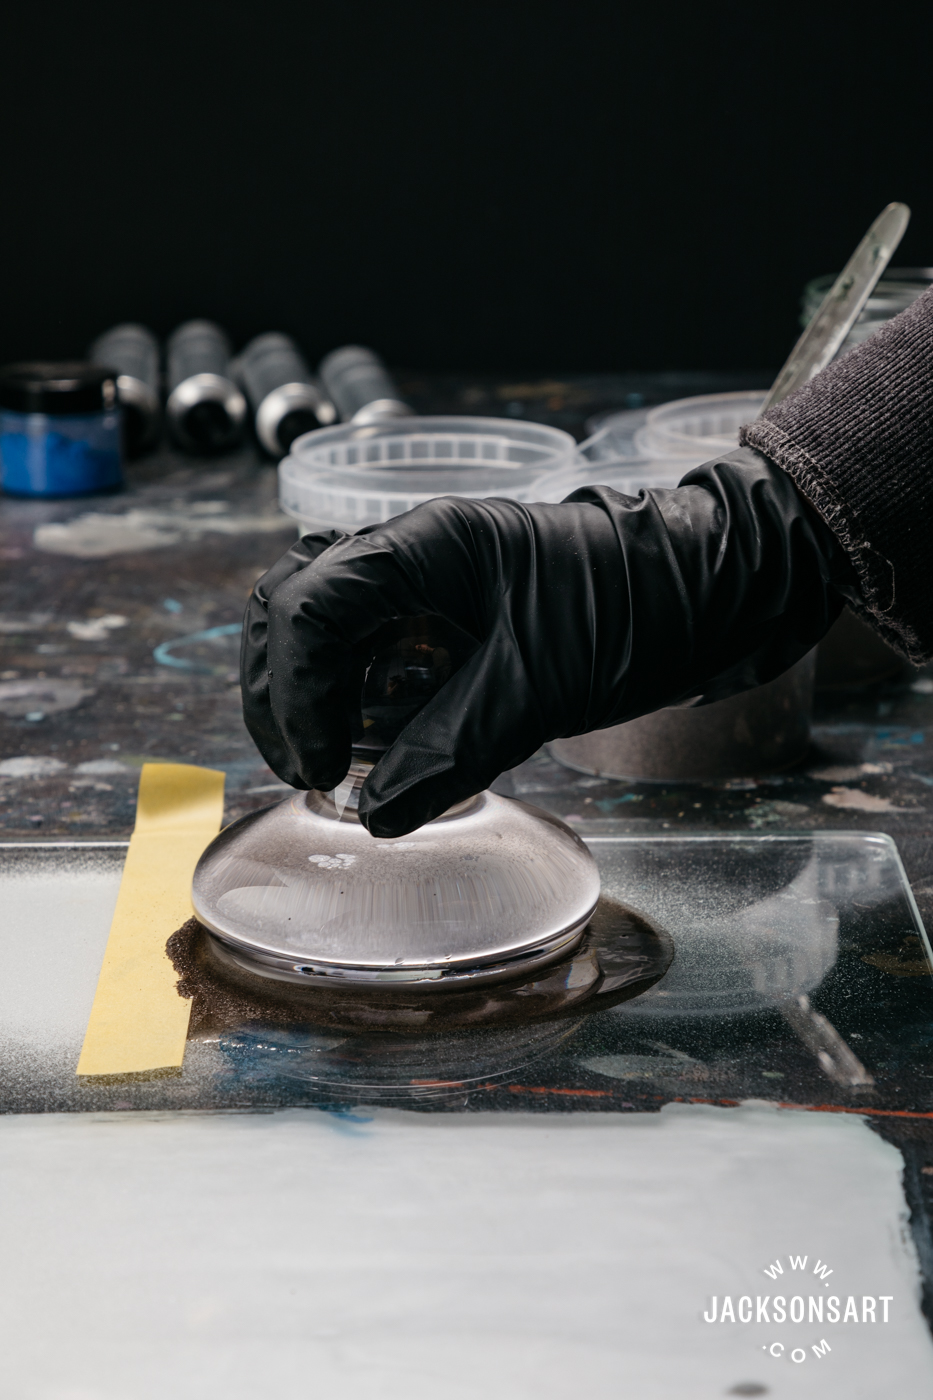
But you don’t really need a chart because you will be making it by feel anyway, the right ratio is when you get a stiff but workable paste. Begin with a small pile of pigment on the slab. Make a well in the centre to pour in a few drops of oil. Stir and scrape with a palette knife until it is a stiff but workable paste, adding more drops of oil or more pigment until you reach the right texture. Then place the muller on top and begin mulling. The mixture will become more runny, so it’s good to start with a pretty stiff mixture. Scrape the sides of the muller regularly to incorporate that back into the mixture. It can take a few minutes per spoonful of paint. Then you scoop up the paint and scrape it into your empty tube. (There is a link at the end to our tube filling article). It helps to lay a damp rag, paper towel, or tea towel flat underneath the slab, like chefs put under their chopping boards, to prevent the slab moving on the table while you are mulling. If the muller suctions to the slab, you may need to pry it up with the palette knife.
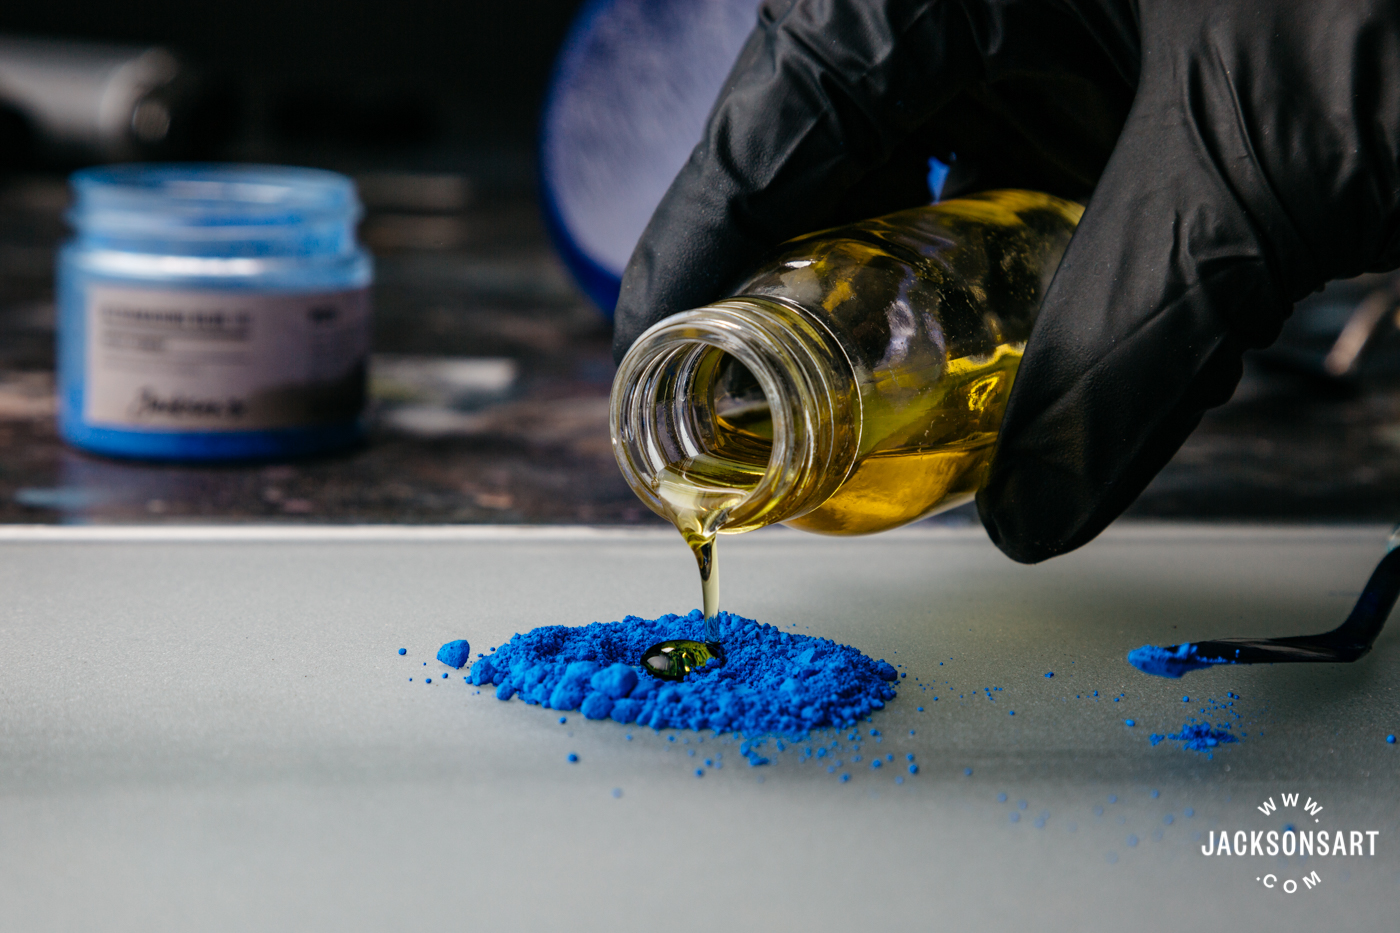
Pouring linseed oil into ultramarine blue pigment on the mulling slab.
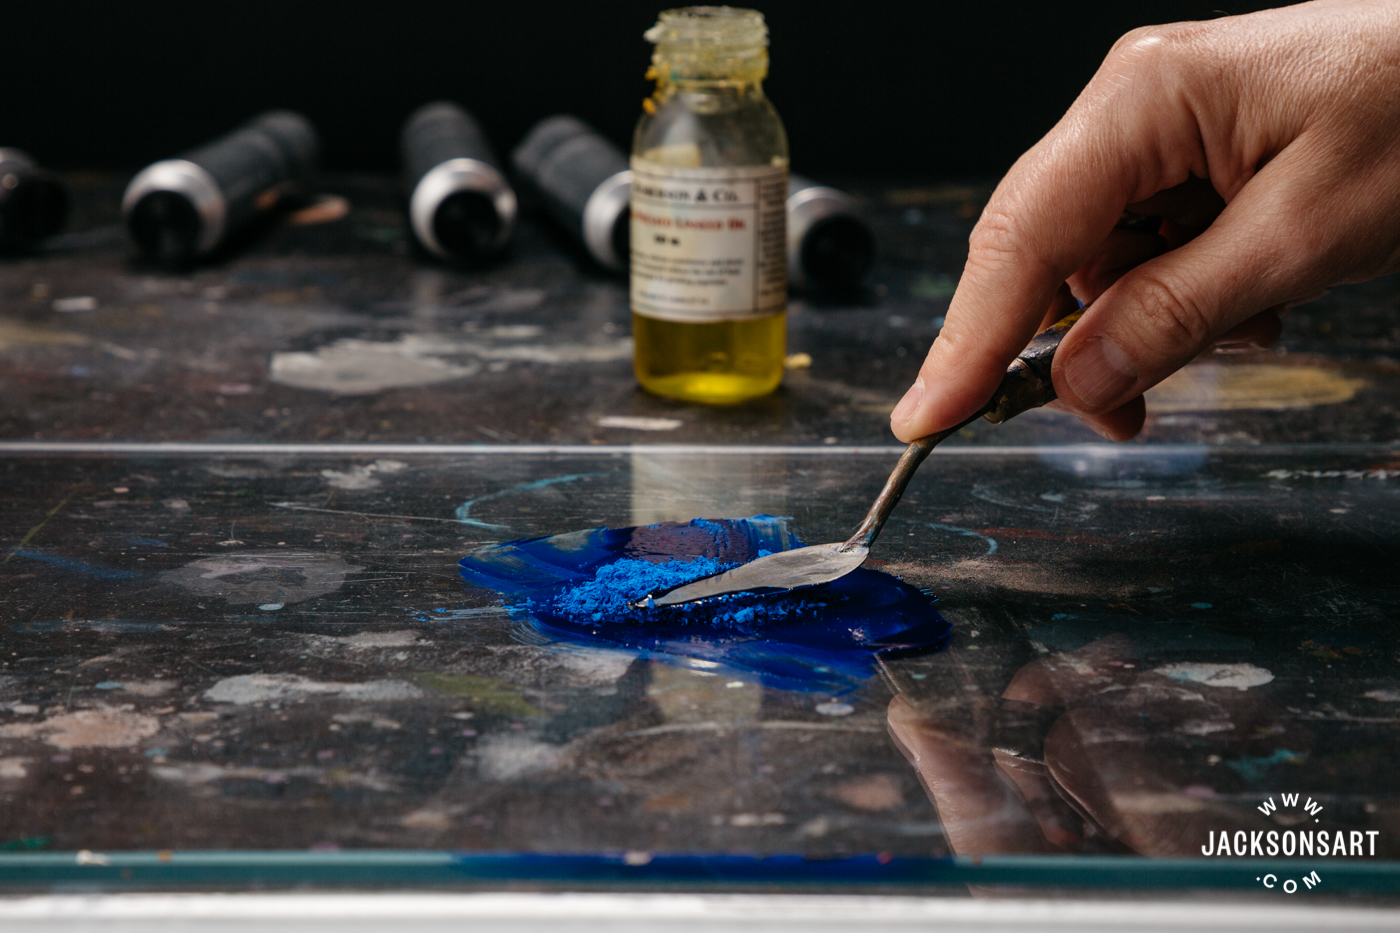
Working the oil and pigment together with a palette knife. (Notice in the background the row of empty oil paint tubes for filling later.)
Continue working the mixture with your palette knife until is is a stiff paste. You are ready to mull the paint now.
You don’t need a lot of pressure, just rotate the muller over the paint pile until it moves easily and become smooth.
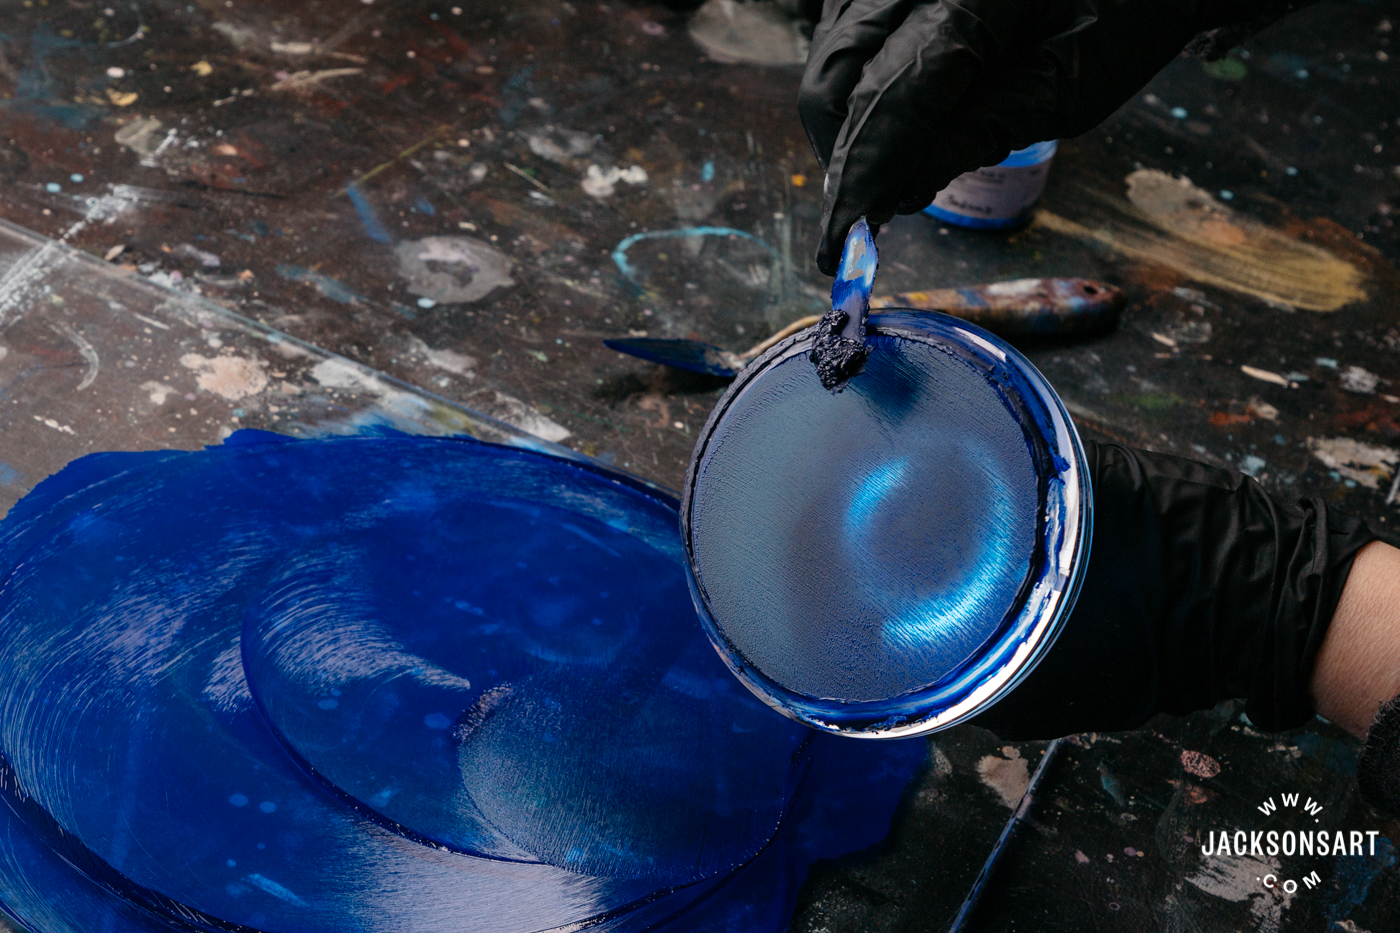
Regularly lift the muller and scrape the unmulled paint that has collected around the edge and put it in the center of the paint, and work it in.

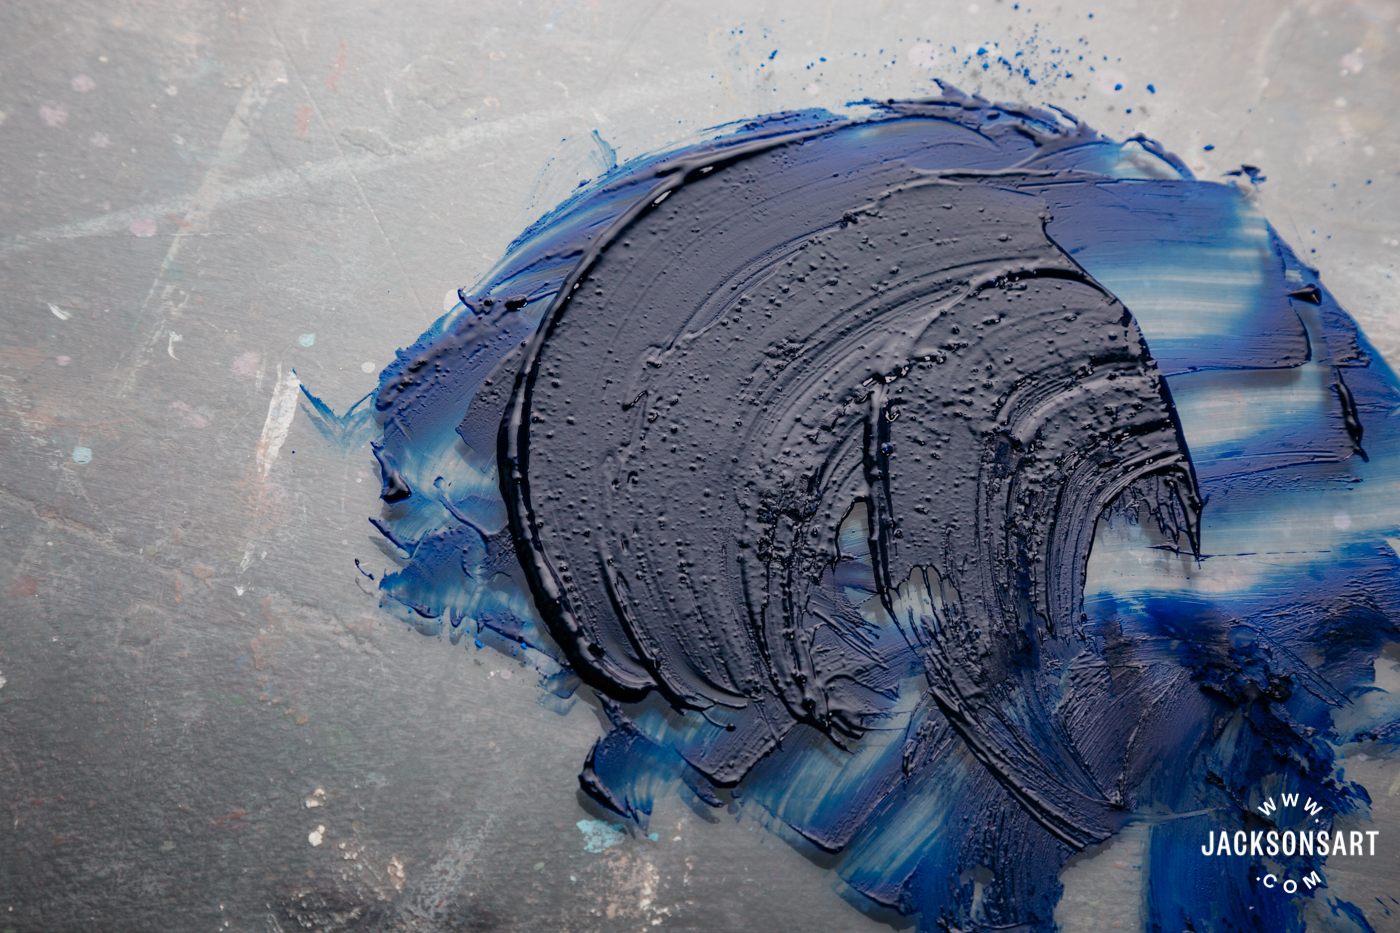
After a few minutes, if you scrape the paint up it should now look very different, smooth and buttery.
To store your paint you will need to put it in a container with no air gap in it, like an empty paint tube. To see this done, see our earlier article Filling Your Own Oil Paint Tubes.
When made commercially, oil paint is put through a triple roll mill repeatedly, to keep rubbing the oil and pigment together, to get the pigment particles coated with the oil. When making oil paint by hand it can take a bit longer to make a much smaller batch of paint because you are rubbing the oil into the pigment on a glass slab and the most you can do is a spoonful at a time.
There is a lot more to learn about oil paint making, this was just an introduction. There are lots of artists online sharing their tips in posts and videos so you can learn more as you go. Some pigments need a tiny bit of an additive like one drop of warm wax to keep them from changing texture in the tube. Instead of a drying oil you can use alkyd and make alkyd oil paints.
Paint Making Safety
When making oil paint, you want the opposite of ventilation, you want still air. There are no fumes to worry about removing and you don’t want the dry pigment powder to get into the air for you to breathe. Even for the more harmless pigments like the earth colours, you should always wear a dust mask because when you are working with anything dusty the pigment particles are so fine you can’t really see them in the air, but you will be breathing them in. Wearing protective gloves like our nitrile gloves is a good safety precaution, to prevent any of the more toxic pigments from absorbing into your skin and to prevent pigment getting under your nails. Avoid eating and drinking around dry pigment. Since you are working with a fine, dusty particulate, make sure there is no food or drink in the room that the fine powder could settle on. Consider wearing eye protection. Keep out of reach of children and pets.
Carborundum Use in Printmaking
Printmaking is the main reason we sell carborundum powder at Jackson’s. Carborundum powder is used as an abrasive in stone lithography and as a texture to hold ink in carborundum printmaking. Carborundum grit is used in stone lithography to prepare a clean, grease sensitive surface. Its uniform particle size allows it to be used to “grain” a stone which removes the previous image. In a similar process to sanding, coarser grit carborundum is applied to the stone and gradually finer and finer grit is applied until the stone is clean. For carborundum printmaking – a collagraph printmaking technique – carborundum grit is painted in a paste on the surface of a plate to create a raised gritty area to capture ink, while the ink can be wiped from the smooth areas of the plate. After putting through a rolling-bed press you get a print of painted marks embossed into the paper.
Further Reading
Materials featured
Testing Methods
If you are interested in a bit more of what I did to figure out the results I shared above.
The top was frosted with coarse carborundum and the bottom with glass etching cream.
My Testing the Etching or Grinding of the Glass
I wanted to change the glass palette to be like a sandblasted glass slab with a fine ground-glass texture matching the face of the mullers. I tested if glass etching cream or grinding with carborundum grit would be better. Etching cream is used to frost glass for decoration. Because the glass used for the palette is toughened, I didn’t know if the etching cream would work, because it doesn’t work on borosilicate glass (Pyrex glass). I also didn’t know if the toughening tensions on the surface of the glass would be broken by the grinding of the grit, and cause it to break. I tested both the etching cream and the grit on a small area and found they both worked, so followed up with tests of how much time of etching and what coarseness of grit were best. I then made some oil paint on each test area to see which allowed the paint to form up the quickest. And I also tested using a muller on a smooth sheet of glass to see if that would do the job just as well. The sound, feel and look of the ground glass of the muller was most closely matched to the grinding with the fine carborundum, but the etching paste was almost as close, so either will work fine.
Testing Etching the Glass Mulling Slab with Etching Cream
No noticeable damage to the brush or squeegee.
The instructions warn that a large area will be uneven. I think this is because the first deposit of cream leaves more of an imprint, so the initial application needs to be applied evenly and quickly. The best way to get an even etch is to start with a thin, evenly brushed on layer. I tried pouring it on an brushing that pour outwards, but the initial pour left a much more obvious etch. Not a real problem probably, because this is not a decorative item that has to be even.
The cream contains crystals, that when warmed and shaken, were supposed to melt but there were still chunks of crystals. This didn’t cause a problem when painting it on but did when I tested using a squeegee and the chunks dragged streaks through it, that left a very streaky etch.
I thought I could get a fast, even application of the etching cream with a squeegee but the lumpy crystals made this impossible.

I tried pouring the cream out and them brushing that outwards, but the original pour line was far more etched than anywhere else.
Testing Grinding the Glass With Carborundum
Carborundum comes in fine, medium and coarse grits. I tested part with coarse, part with medium and part with fine. I also tried a sequence of grinding first with coarse, then with medium, then with fine and an area with the a sequence in the reverse order, since my aim was to roughen, not polish. I also tried grinding over an cream etched surface, to see if that speeded up the ‘frosting’ of the surface. (It didn’t seem worth the extra effort.) It turns out that grinding with the fine grit was the best way to make a surface that matched the muller and was good for making oil paint.
This has six section of different grit some in a sequence.
My chart for the sections, underneath the glass.


Fine, medium and coarse carborundum in 500g tubs.

Testing Making Oil Paint on the Different Surfaces
I tested making the paint on all the different surfaces.

[ad_2]
Source link


